| Table of Contents |
Chapter 1: Introduction to HTML
  * What is HTML?
  * Basic HTML Guidelines
  * HTML Editors, creating your website
  * How do I post my webpage?

Chapter 2: Markup Tags
  * Basic tags
  * Special tags
  * Hyperlinks

Chapter 3: Making your page look better
  * Tag attributes
  * Visual effects
  * Formatting

Chapter 4: Lists
  * Using various types of lists
  * Nesting lists

Chapter 5: Multimedia
  * Intro to graphics files
  * Using Images in your HTML document
  * Audio/Video and your webpage

Chapter 6: Tables
  * Creating simple tables
  * Advanced features of tables

Chapter 7: Frames
  * Splitting your document into frames
  * Special concerns when working with frames

Chapter 8: Forms
  * Designing a form
  * Processing form data

Chapter 9: Image Mapping
  * Image Mapping

Chapter 10: "Behind the scenes" HTML
  * Meta commands
  * Commenting
  * Extracting Source Code

Chapter 11: Cascading Style Sheets (CSS)
  * Meta commands
  * Commenting
  * Extracting Source Code

Chapter 12: Other Advanced Concepts (brief overview)
  * Image Mapping
  * Javascript
  * PERL
  * Java Applets
  * Designing for maximum "viewability"
| CHAPTER 1: Introduction to HTML |
HTML documents are plain-text (also known as ASCII) files that can be created using any text editor (such as Notepad or Wordpad on a Windows machine). You can also use word-processing software if you remember to save your document as "text only with line breaks". My favorite HTML editor is a great text/HTML editor well suited for advanced web site design, called TextPad.
Some HTML-specific editors are also available (Homesite, Hotdog, etc.). You may wish to try one of them after you learn some of the basics of HTML tagging. Often these HTML editors allow "WYSIWYG" editing. WYSIWYG is an acronym for "what you see is what you get"; it means that you design your HTML document visually, as if you were using a word processor, instead of writing the markup tags in a plain-text file and imagining what the resulting page will look like. WYSIWYG editing can be useful for beginners, but often produces "sloppy" code which may be difficult to update with advanced features. Your best bet is to learn good HTML coding from the ground up, and then you can decide what is best for you.
Once you have your files ready to post on the internet (or intranet as the case may be), you should contact the individual who maintains the server to see how you can get your files on the Web. The most common way to do this is via an interface called File Transfer Protocol (FTP). WS_FTP is a great apllication that uses this protocol and is very easy to use.
Before we get started, here are a few common terms which we will be using frequently:
The part of your Web browser most often mentioned is the browser display window (also the display window or browser window). This is the part of the Web browser where the actual contents of an HTML document are displayed.
The other thing I'll mention is the history list (sometimes called the go list). That's the list of pages you've visited during the current session. In most browsers, it is available as either a menu or a pop-up dialog box.
Favorites, Refresh, Home, etc.
Web browsers are written by different people. Each person has their own idea about how Web documents should look. Therefore, any given Web document will be displayed differently by different browsers. In fact, it will be displayed differently by different copies of the same browser, if the two copies have different preferences set.
Therefore, you need to keep this principle foremost in your mind at all times: you cannot guarantee that your document will appear to other people exactly as it does to you. In other words, don't fall into the trap of obsessively re-writing a document just to get it to "fit on one screen," or so a line of text is exactly "one screen wide." This is as pointless as trying to take a picture that will always be one foot wide, no matter how big the projection screen. Changes in font, font size, window size, and so on will all invalidate your attempts.
On the other hand, you want to write documents which look acceptable to most people. How? Well, it's almost an art form in itself, but my recommendation is that you assume that most people will set their browser to display text in a common font such as Times at a point size of somewhere between 10 and 15 points. While you shouldn't spend your time trying to precisely engineer page arrangement, you also shouldn't waste time worrying about how pages will look for someone whose display is set to 27-point Garamond. I is always a good thing to test out your web pages in several common browsers/versions to make sure they will look acceptable to your target audience. At a minimum, you should test it out in NS and IE, version 4 or higher.
| CHAPTER 2: Markup Tags |
HTML is composed of tags. HTML tags are always enclosed in angle-brackets ( < > ) and are case-insensitive; that is, it doesn't matter whether you type them in upper or lower case. I almost always use lower case, but that's just me. You can do whatever you like. I have found that the code tends to be more readable when you use all lowercase tags.
Tags typically occur in begin-end pairs. These pairs are in the form
<tag> ... </tag>
where the <tag> indicates the beginning of a tag-pair, and the </tag> indicates the end. (The three dots indicate an arbitrary amount of content between the tags.) The usual way to refer to each tag is "tag" for the first and "slash-tag" for the second, where tag is the actual name of the tag being discussed.
These pairs define containers. Any content within a container has the rules of that container applied to it. For example, the text within a "boldface container" would be boldfaced. Similarly, paragraphs are defined using a "paragraph container."
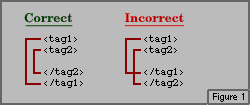
Thinking of tag-sets as containers will help in another way: it will help you remember that tags should always be balanced. In other words, you should keep containers nested within each other, just as you would have to do in the real world. Let's try some visual examples where we actually draw the containers:
Why should you worry about this? Well, if you start overlapping containers as shown on the right, about the best you can expect is that the document will be formatted in unexpected ways.
One more thing to keep in mind with regards to containers. Since HTML is based on these structures, it is often the case that the arrangement of text within a container is irrelevant. For example, within a paragraph container, all of the text can be in one long line, or in a series of separate lines, or with every word on its own line, or with every word separated from every other by nineteen spaces. These would all be displayed exactly the same.
Therefore, try to keep in mind this thought: whitespace doesn't matter. (Whitespace is all of the blank areas in a text file--empty lines, extra spaces, and so on.) I'll mention this again when discussing the paragraph tag, and it will crop up in other places. Again: whitespace doesn't matter.
Having said all that, I will now attempt to muddy the waters a bit by mentioning that not every tag in HTML is paired. Some tags, such as the line-break tag, stand on their own (that is, they have no closing tag). These are known as empty tags. As we encounter them, I'll point them out.
In summary, use the following conventions when writing web pages:
Every HTML document should contain certain standard HTML tags. Each document consists of head and body text. The head contains the title, and the body contains the actual text that is made up of paragraphs, lists, and other elements. Browsers expect specific information because they are programmed according to certain HTML specifications.
Required elements are shown in this sample bare-bones document:
Insert info here on tag attributes...
|
|
The required elements are the following tags (and their corresponding end tags):
Because you should include these tags in each file, you might want to create a template file with them. (Some browsers will format your HTML file correctly even if these tags are not included. But some browsers won't! So make sure to include them.) These are referred to as "document tags".
By "document tags," I mean the tags which divide up a Web page into its basic sections, such as the header information and the part of the page which contains the displayed text and graphics. This may seem confusing right now. Just hang on.
The first and last tags in a document should always be the HTML tags. These are the tags that tell a Web browser where the HTML in your document begins and ends. The absolute most basic of all possible Web documents is:
That's it. If you were to load such a page into a Web browser, it wouldn't do anything except give you a blank screen, but it is technically a valid Web page. Obviously, you'll want more than that.
The HEAD tags contain all of the document's header information. When I say "header," I don't mean what appears at the top of the browser window, but things like the document title and so on. Speaking of which...
This container is placed within the HEAD structure. Between the TITLE tags, you should have the title of your document. This will appear at the top of the browser's title bar, and also appears in the history list. Finally, the contents of the TITLE container go into your bookmark file, if you create a bookmark to a page.
What you type should probably be something which indicates the document's contents, but it doesn't have to be. The length of the title is pretty much unlimited, but don't go overboard. Users will either sneer at or be confused by exceedingly long titles.
If you don't type anything between the TITLE tags, or don't include the TITLE tags at all -- remember the blank document in the HTML section earlier? -- then the browser will typically use the actual file name for the title. Therefore, a document titled "TCh4ex4.html" will have that name appear in the history list. Again, you can choose to do this, but it will likely generate either confusion or contempt.
You should only have one TITLE container per document. Having more than one instance could cause enexpected results. Usually, the last title reference given will be used, but this type of overlap should be avoided!
BODY comes after the HEAD structure. Between the BODY tags, you find all of the stuff that gets displayed in the browser window. All of the text, the graphics, and links, and so on -- these things occur between the BODY tags. We'll get to what happens there starting with the next chapter.
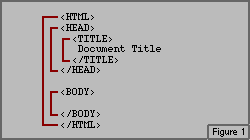
So, putting everything we've covered thus far into one file, we have:
This time, the result would be a document with a completely blank browser window, but at least the words "Document Title" would appear in the browser's history list.
Let's look at the above block of HTML again, but this time with container lines sketched in. Note that the TITLE tags and text have been rearranged to make it easier to draw in the container lines. The rearrangement of the text does not in any way change the resulting Web page's appearance.
If you want to leave yourself notes in an HTML document, but don't want those notes to show up in the browser window, you need to use the comment tag. To do that, you would do the following:
Your note would go where the text Hi, I'm a comment. appears. Yes, you do need an exclamation point after the opening bracket, but not before the closing bracket. That's the way the standard is written. I have no idea why. Also, there is no end tag; that is, a tag like </!-- text --> does not exist. The comment tag is not a container. This is our first example of an empty tag.
You can put comments pretty much anywhere, but you have to be aware of one important thing: you shouldn't put any HTML markup within a comment tag. Theoretically, you should be able to, but some browsers handle this less than gracefully (i.e., they either mess up or crash). This can be useful for commenting out sections of code for use later.
What if you get the tag wrong, like forgetting to include the exclamation point? In that case, the text you did type in would be displayed.
Commenting in Javascript and VBS code...
Just to confuse matters, if you have a Javascript or VBS script embedded in your file, it should be commented...
All right, we know how to set up a document, but all we've gotten so far has been dull, blank browser windows. Time to fix that.
You'll remember that I discussed the way tag-pairs are used to create containers in which content is held and certain rules applied to it; in short, the structural nature of HTML. We've already seen some of that in the way a Web document is split into two main sections: the document's header and body. In this chapter, we're going to get into some of the structures within the BODY.
The heading structures are most commonly used to set apart document or section titles. For example, the word "Headings" at the beginning of this section is a heading. So is this document's title (it's at the top of the page, in case you somehow missed it).
Remember that these heading structures go into the body of the document. The headings being discussed here have nothing to do with the HEAD structure from the previous chapter.
There are six levels of headings, from Heading 1 through Heading 6. Heading 1 (H1) is "most important" and Heading 6 (H6) is "least important." By default, browsers will display the six heading levels in the same font, with the point size decreasing as the importance of the heading decreases. Here are all six HTML pairs, in descending order of importance:
These six lines, when placed into an HTML document, will simply display the six levels of headings.
Since, as we have discussed, whitespace doesn't matter, you might think that the above block of HTML would just string the content into one line of text. However, because headings are meant for section titles and the like, they are defined as existing on a line by themselves. A heading always begins at the margin of a line and always forces a line break at the end of the heading. In other words, you cannot have two heading levels on the same line.
This also means that you cannot highlight text in the middle of a paragraph by marking it as a heading. If you try this, the paragraph will be split in two, with the heading text on its own line between the two pieces. (Later on, we'll talk about ways of highlighting text). To do this, you will need to use a different tag like FONT.
If you have a browser which is set close to its default settings, you'll notice that the text for the last two headings gets pretty small. This leads to some page designers using H6 for the fine print at the bottom of pages. This is a mistake, not to mention an abuse of the heading structure. As you no doubt know, many browsers allow the user to set the size of each element, including the headings. If a user sets H6 to a size of 18 point, the fine print won't be so fine any more! Remember: you cannot guarantee that your document will appear to other people exactly as it does to you.
As you might suspect, paragraphs are quite common in Web pages. They are one of the most basic structures in HTML. If you regard a document as a collection of structures and sub-structures, you may come up with something like:
The overall structure is a page. The page is composed of a number of sections, each of which is composed of one or more paragraphs. Each paragraph is composed of words, and each word of letters.
Admittedly, this is a simplified way of looking at text, but it will do for our purposes. The furthest HTML goes down this progression is to the paragraph level.
The beginning of a paragraph is marked by <p>, and the end by </p>.
Let's say you want to create a paragraph. You start to wonder, "What happens if I hit return at the end of every line in the paragraph? Should I make the paragraph just one long continuous line? What if I accidentally put too many spaces between words?"
At this point, you should once again be saying to yourself: whitespace doesn't matter. You could put each word on its own line, and the paragraph would look completely normal. In fact, no matter how much whitespace you put between words, whether returns or spacebar hits, the words will be separated by one space in a Web browser.
Got all that? If you're not sure you completely understand, go through the section again -- or better still, try it on your own.
So what if you want to end a line after a certain word, but don't want to start a new paragraph? Well, what you need is a line break, which is invoked by using the <br> tag. This forces a line break wherever you place it in the content (that is, whatever is after the <BR> tag will start from the left margin of the next line on the screen.)
And no, there is no </br> tag. The line break tag is -- that's right! -- an empty tag. And when you think about it, this makes sense. The concept of a line break beginning and ending doesn't really work, since a line break is a one-shot occurrence.
Blockquotes are handy for those long pieces of text which are quoted material and therefore need to be set apart and indented. That is exactly what blockquote does. For example:
This section of text is surrounded by the blockquote tags. A blockquote can exist inside of a paragraph, and always lives on its own line (which is to say, there is an implied line break before and after the blockquote, just as with headings or paragraphs themselves).
Blockquotes are set up as follows:
<blockquote> ...text... </blockquote>
Just like most other things in HTML, it's a container.
The "correct" way to highlight text is to use the logical tags, which do not directly specify the type of highlighting they will employ. There are 'defaults' written into the specification (see the quotations below) but there is no direct rule about which tag should be displayed in what way. This is entirely in keeping with HTML's structural nature.
These tags are recommended for use because they leave the most control to the reader of a document. However, in the real world, the tags in the next section are a lot more popular than those above.
The tags I will cover here are sometimes called forced style tags, because their very nature forces a certain style within the document (at least, that's the idea). This does run counter to the entire "HTML is purely structural" philosophy, but my advice is not to worry about it too much. As long as you use the logical style tags where appropriate, then you're fine.
The four most commonly used forced style tags are very simple:
The HTML 2.0 Specification does allow the mixing of these styles, but does not require that a consistent appearance be maintained. In other words, different browsers will display combined styles differently. Some will pick one or the other style, others will not display either, and a few will simply crash.
The horizontal rule is a pretty useful effect. Horizontal rules are not allowed within headings. The tag, which is empty, is <HR>, and produces the following:
There. That was pretty easy, wasn't it? Now that you have everything you need to arrange your text, it's time to start linking things together.
The real point of the Web, of course, is that documents can be linked to each other, or to other types of files such as movies or sound clips, through the use of hyperlinks. These links allow authors to link documents together in intuitive ways, as opposed to traditional linear texts such as books, articles, or almost anything else printed.
In order to create a hyperlink, you'll need to know two things. The first is the URL -- that is, the location -- of the file to which you want the link to go. (If you are unclear as to how URLs work, take a look at NCSA's A Beginner's Guide to URLs.) The second is knowledge of how links work, which is the subject of this chapter.
The simplest possible anchor starts with <A> and ends with </A>. However, you will never ever use the <A> tag by itself, because it doesn't do anything. You'll need to enhance the <A> tag with attributes like...
HREF stands for "Hypertext REFerence," which is another way of saying, "The location of the file I want to load." Most anchors are in the form <A HREF="URL">, where URL is the location of the resource to which you want the link to point. For example, the CWRU Web server is at "http://www.cwru.edu/" (that's the server's basic URL). A sentence which contained a link to that address would look something like:
     Check out the <A HREF="http://www.cwru.edu/">CWRU Web server</A>--
      it's pretty cool!
The words between the open and close of the anchor ("CWRU Web server") would be displayed as a hyperlink. Selecting that link within a Web browser would cause the browser to load the CWRU Web server's main page. Here's what the above markup looks like in your browser:
Check out the CWRU Web server-- it's pretty cool!
The double-quote marks found around the value of HREF in an anchor are, under certain specific circumstances, optional. However, in most cases they are required. In addition, if you start the URL with a double-quote, you must close it with another. Just as tags need to be balanced, quote-marks do too. I personally recommend the use of the double-quotes, because it's a good habit to get into, especially when it comes to named anchors (below). Besides, in most cases they'll be required, so just go ahead and use them all the time.
A URL (and therefore, by implication, an anchor) can point to any resource available on the Web. This is usually another HTML page, but it can also be a graphic, a sound file, a movie, or any other kind of file. This fact lets you set up links to large graphics without actually having to display them in the page. For example, if there were a graphic file called "welcome.gif" in the directory "emeyer" of a server with the address "www.site.edu," the URL would be:
http://www.site.edu/emeyer/welcome.gif
Therefore, a text anchor referring to this graphic file would look something like:
<A HREF="http://www.site.edu/emeyer/welcome.gif">See my welcome message!</A>
A user who selects the anchor thus created will cause his Web browser to download the graphic file, which will then be displayed by his browser or by a helper program. The same general principles hold true for referring to sound files, movie files, multimedia files, and any other non-HTML files. So if I wanted to refer to a sound file called "welcome.au" in the same directory as the welcome graphic, I might set up a link like this:
<A HREF="http://www.site.edu/emeyer/welcome.au">Hear my welcome message!</A>
In case you were wondering, the first four letters of a Web URL do mean something. http stands for "HyperText Transfer Protocol," which is the technical way of saying "how the computers move Web data back and forth."
Well, all this is fine for linking between files, but what about jumping around within a document? Glad you asked.
You can make it easy for a reader to send electronic mail to a specific person or mail alias by including the mailto attribute in a hyperlink. The format is:
<A HREF="mailto:emailinfo@host">Name</a>
For example, enter:
 <A HREF="mailto:pubs@ncsa.uiuc.edu">
 NCSA Publications Group</a>
to create a mail window that is already configured to open a mail window for the NCSA Publications Group alias. (You, of course, will enter another mail address!)
Using the NAME attribute, you can invisibly mark certain points of a document as places that can be jumped to directly, instead of loading the document and then scrolling around to find what you're after. This is accomplished by using a named anchor, which is slightly different than the anchor used to create a hyperlink.
Setting a named anchor is done using the form <A NAME="label"> ... </A>, where label is any text you care to use. It could be anything from chapter1 to 2.4.1 to oscar-the-grouch. So putting a name of pt.3 to the text "Part 3: Bagels and You" would be accomplished like this...
<A NAME="pt.3">Part 3: Bagels and You</A>
...and would look like this:
Part 3: Bagels and You
Note that there is no obvious, visible way to tell that the text has been named. This is as it should be. The only way named anchors are important is if they're referred to somewhere else. Also note that the HREF attribute does not appear in this anchor. It can do so, but it is not required; the only requirement is that an anchor have either an HREF or a NAME attribute. It need not have both.
How does this happen? Using a standard hyperlink, of course, but with a small addition. Found in the HREF attribute, the name is tacked onto the end of the URL of the document in which it appears. To do this, just enter document's URL, and then add a pound-sign and the name to the end of the URL. For example, assuming that the document's URL is "http://www.site.edu/food.html," the pointer to the named anchor pt.3 would be:
http://www.site.edu/food.html#pt.3
A hyperlink which has the above URL in its HREF attribute will take the reader straight to the text contained within the anchor <A NAME="pt.3">... </A> within the file "food.html." (Incidentally, if the browser loads a file but can't find the named anchor which has been specified, it simply goes to the top of the file, just as it would have if there hadn't been a name in the URL at all.)
Now, you may be confused about why a pound-sign (#) is in the URL. That pound-sign is how the browser knows that it's looking for a name, and how it keeps the named anchor separate from the document's filename. Therefore, if you are writing a hyperlink which points to a named anchor found within the same document, you only need to have the pound-sign followed by the name of the anchor. For example, a hyperlink to Part 3 which is found within the file "food.html" would have this markup:
<A HREF="#pt.3">Part 3</A>
A common use for named anchors is to create a "table of contents" at the top of a long document. This approach was used in the markup of individual departments in the CWRU General Bulletin, as well as many other pages in the CWRU Web system. Each section within a document is given a named anchor, and hyperlinks to each of these anchors are put at the top of the file.
Unlike HREF, the double-quotes in the NAME attribute are never optional (because of the # character). This has another benefit, in that you may use spaces in your name. Why does this make a difference? Here's an example, assuming for the moment that the quotes aren't used: the anchor <A NAME=section 1.2> would create an anchor name section. This is because the space between section and 1.2 would be interpreted as the separator between attributes. The Web browser would take section as the name, toss out 1.2 as an unrecognized attribute, and proceed merrily along.
Similarly, the reference <A HREF=#section 1.2> would look for an anchor named section and completely ignore the 1.2.With the use of double-quotes, which are pretty much required anyway, this problem does not occur.
For those of you who have been through the companion to this tutorial, you will recall that in earlier, we discussed a number of logical style tags (as well as the forced-style tags). For the purposes of clarity and simplicity, I did not cover all of the logical style tags in that chapter, a fact that I intend to remedy here.
Here are the remaining tags, all of which are containers:
Remember that these are all logical style tags, so the actual display of these elements will vary by browser.
The last type of special-effect tag, <PRE>, is complicated enough to warrant its own section. So...
That's what <PRE> defines: preformatted text. It's a container, and it's a very special one.
Again, those of you who have read my tutorial Introduction to HTML will recall that I spent a lot of time droning on about the fact that whitespace doesn't matter. Extra spaces between words, multiple returns, blank lines-- all of these disappear in an HTML document, due to the structural nature of HTML.
Well, almost. There is an exception to this rule. In a preformatted text block, whitespace does matter. Suddenly, the number of spaces between words, or blank lines between paragraphs, will be seen.
Markup:
   <PRE>
     Now is the time     for all good men
          to come to the aid of          their network...
   </PRE>

Result:
     Now is the time     for all good men
          to come to the aid of          their network...
Thus, it is possible to use preformatted text to achieve otherwise impossible effects, such as aligning columns of numbers. Just insert the right number of spaces, and that spacing will be preserved.
This ability to utilize whitespace does not come without its prices, however. The first, as you can already see, is that the browser uses a monospaced font (that is, one in which all the characters have exactly the same width) to render preformatted text, much as it does for the <TT> tag. Most readers find this a less attractive type of display.
The second price is that the usual browser formatting rules go right out the window. For example, text within a preformatted text block does not flow within the margins of the browser window. So, if I have a really long line of text within a preformatted text block, it will go right off the edge of the screen. This is obviously not a very good thing.
There are also restrictions on which other HTML tags may be placed inside the preformatted text container, and in what contexts a preformatted text block may occur. Headings are forbidden within preformatted text blocks, as are paragraph tags. In fact, about the only tags allowed inside <PRE>...</PRE> are the anchor tag, the image tag, the line break tag, the horizontal rule, and the various text-effect tags (both logical and forced).
You may place a preformatted text block within the <BODY> container, obviously, as well as <blockquote>, the <DD> tag, forms (which are covered in Chapters 4-8 of this tutorial), and a list item in a list. Unfortunately, that's all.
Although by far the most common header element, <TITLE> is not the only tag which is allowed in the header of an HTML document. There are other tags, though most of them are not very popular. The two which are perhaps the least unpopular are discussed below.
Consider this example of HTML:
    <B>This is an example of <I>overlapping</B>
    HTML tags.</I>
The word overlapping is contained within both the <B> and <I> tags. A browser might be confused by this coding and might not display it the way you intend. The only way to know is to check each popular browser (which is time-consuming and impractical).
In general, avoid overlapping tags. Look at your tags and try pairing them up. Tags (with the obvious exceptions of elements whose end tags may be omitted, such as paragraphs) should be paired without an intervening tag in between. Look again at the example above. You cannot pair the bold tags without another tag in the middle (the first definition tag). Try matching your coding up like this to see if you have any problem areas that should be fixed before you release your files to a server.
HTML protocol allows you to embed links within other HTML tags:
<H1><A HREF="Destination.html">My heading</A></H1>
Do not embed HTML tags within an anchor:
    <A HREF="Destination.html">
    <H1>My heading</H1>
    </A>
Although most browsers currently handle this second example, the official HTML specifications do not support this construct and your file will probably not work with future browsers. Remember that browsers can be forgiving when displaying improperly coded files. But that forgiveness may not last to the next version of the software! When in doubt, code your files according to the HTML specifications.
Character tags modify the appearance of the text within other elements:
    <UL>
    <LI><B>A bold list item</B>
    <LI><I>An italic list item</I>
    </UL>
Avoid embedding other types of HTML element tags. For example, you might be tempted to embed a heading within a list in order to make the font size larger:
    <UL>
    <LI><H1>A large heading</H1>
    <LI><H2>Something slightly smaller</H2>
    </UL>
Although some browsers handle this quite nicely, formatting of such coding is unpredictable (because it is undefined). For compatibility with all browsers, avoid these kinds of constructs. (The Netscape <FONT> tag, which lets you specify how large individual characters will be displayed in your window, is not currently part of the official HTML specifications.)
What's the difference between embedding a <B> within a <LI> tag as opposed to embedding a <H1> within a <LI>? Within HTML the semantic meaning of <H1> is that it's the main heading of a document and that it should be followed by the content of the document. Therefore it doesn't make sense to find a <H1> within a list.
Character formatting tags also are generally not additive. For example, you might expect that:
<B><I>some text</I></B>
would produce bold-italic text. On some browsers it does; other browsers interpret only the innermost tag.
To see a copy of the file that your browser reads to generate the information in your current window, select View Source (or the equivalent) from the browser menu. (Most browsers have a "View" menu under which this command is listed.) The file contents, with all the HTML tags, are displayed in a new window.
This is an excellent way to see how HTML is used and to learn tips and constructs. Of course, the HTML might not be technically correct. Once you become familiar with HTML and check the many online and hard-copy references on the subject, you will learn to distinguish between "good" and "bad" HTML.
Remember that you can save a source file with the HTML codes and use it as a template for one of your Web pages or modify the format to suit your purposes.
| CHAPTER 3: Making your page look better |
I know you're just itching to find out how you can make your documents all colorful and put backgrounds on your pages, so we'll start there. In the next chapter, I'll transit into other visual effects such as font sizing and new style tags.
Note that you must have your browser set to use document colors and backgrounds for the examples in this chapter, and the following chapters, to make sense. If your browser is set to always use your settings no matter what, then you won't be able to see the effects described in the text.
In a recent survey of Web users, it was found that the four most important features that users look for in a web site are Fast loading times (89%), Intuitive navigation (78.5%), Simple, focused content (73.1%) and Attractive graphics (33.3%).
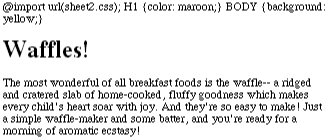
Once upon a time, the BODY tag was a lonely tag-- it had no attributes. Then lo, the HTML committees did look upon the Web, and did see that documents were boring and in need of visual enhancement, or, to use the ancient dialect, "eye candy." Then did they speak among themselves, and decide that this effect could be achieved by adding attributes to BODY. And verily, so it was done.
Thus were backgrounds invented (and BODY was made less lonely). Originally a feature of HTML 3.0, backgrounds were for some time only supported by Arena, a UNIX-based browser. Then Netscape 1.1 introduced backgrounds to the masses, and the Web hasn't been the same since. Whether this is a good or bad thing depends on who you ask and which page they're viewing. While a good background can make a page look really great, there are few things worse than an obnoxious background. At the end of this chapter, I'll take a moment to discuss using backgrounds effectively.
You can specify two kinds of background using the BODY tag. The first kind is a solid color; the second, a tiled image.
If all you want for a page's background is a solid color -- let's say a medium tan -- then you can specify it using the attribute bgcolor. The value of bgcolor is a hexadecimal number that represents the color you want.
<BODY bgcolor="#xxxxxx">
...where xxxxxx is a six-digit hexadecimal number such as C0A280. Therefore, the BODY tag shown above would become:
<BODY bgcolor="#C0A280">
The pound sign (or number sign or whatever) denotes that the string following is a hexadecimal number, so it's required. The hexadecimal number breaks down into three pairs, as follows: the first pair of digits give the red value, the second pair the green value, and the last pair the blue value. Each pair can go from 00 to FF, which in regular base-ten numbering works out to the range 0-255. Therefore:
C0--> 75% red
A2--> 63% green
80--> 50% blue
How did I get those percentages? I'll take the red value as an example. I converted C0 to the corresponding decimal number (192) and then divided it by 256 to arrive at a percentage:
C0 hex --> 192 decimal
192/256 = 0.75 (in other words, 75%)
Presto! Therefore, in order to figure out the hexadecimal value of a given percentage, simply divide it by 100, multiply that by 256, and convert the result to hexadecimal notation. As an example:
55% red would be...
55/100 = 0.55
0.55 * 256 = 140.8 (round to 141)
141 decimal --> 8D hex
What could be easier? Besides an unanaesthetized root canal, I mean.
All right, so it's a bit annoying having to convert three percentages to numbers and then convert them to hex every time you want to come up with a color... not to mention the process of figuring out what the red-green-blue percentages are to begin with. Fortunately, some programs available on the Internet allow you to pick a color from a color wheel or palette, and will then give you the hexadecimal code representing that color.
Note that different computers will display a given color code differently. This is true in any case, even with graphics, but it can be more noticeable with a solid-color background. As an example, the hexadecimal notation for brown on a Macintosh is #371212, whereas on a typical Intel-based machine the code would be #A52A2A. Therefore, using the code representing brown on a Macintosh will show PC users a color other than brown, and vice versa. The problem tends to vanish at extremes; that is, where the pair values approach either 00 or FF, the colors will become more 'universal.' For example, blue (#0000FF) looks more or less the same no matter what platform you're using. As usual, the basic thing to keep in mind is that what you see on your screen won't necessarily be what others see on theirs.
Of course, just when you thought this was going to be far too annoyingly difficult, the standards commitees have come to the rescue. (They're cool that way.) The HTML 3.2 specification currently includes the ability to use one of sixteen named colors instead of a hexadecimal number. These colors, along with their hex equivalents, are:
        Black  = "#000000"       Maroon  = "#800000"
        Green  = "#008000"         Navy  = "#000080"
       Silver  = "#C0C0C0"          Red  = "#FF0000"
         Lime  = "#00FF00"         Blue  = "#0000FF"
         Gray  = "#808080"       Purple  = "#800080"
        Olive  = "#808000"         Teal  = "#008080"
        White  = "#FFFFFF"      Fuchsia  = "#FF00FF"
       Yellow  = "#FFFF00"         Aqua  = "#00FFFF"
Therefore, to set the background color of a document to white, you would use the BODY tag:
<BODY bgcolor="white">
You do not preface a named color with a pound-sign. Doing so will likely confuse a Web browser.
Not every browser will recognize these color names, so you need to be careful. On the other hand, newer browsers such as Netscape will recognize a whole bevy of named colors besides the sixteen listed above, and there are a number of lists of color names and their corresponding hexadecimal codes. A good place to start is the Color Information page provided by Yahoo!.
So why even bother with the hexadecimal notation? Well, it gives maximum flexibility. Instead of being restricted to the named colors recognized by various browsers-- and not every browser will recognize the same named colors as every other browser-- you can directly specify the exact color you want. Or at least try to, given the variance in color display between platforms.
Did I mention that this was going to be frustrating?
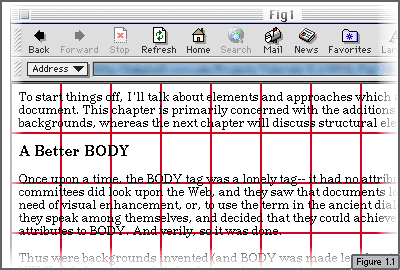
Solid colors can be very nice, of course, but what if you want something a little fancier than a solid color-- for example, a nice kitchen-tile pattern? (Oh, lovely!) This can be accomplished using an image of a single tile, which the browser will repeat indefinitely. The repeat pattern follows the grid pattern shown by the red lines in Figure 1.1. (In that example, the background image is 50 pixels tall by 50 pixels wide.)
...so a small image can be used to create interesting effects. I could, for example, use this image as a background:
to create a very Zen sort of page.
This is all accomplished by adding the attribute background to the BODY tag. The value of this attribute is the URL of the image you want to tile in the background. So, for example, let's assume the above yin-yang image is located at http://images.site.net/yinyang.gif. In order to get the effect shown in the above example, you would need to write:
<BODY background="http://images.site.net/yinyang.gif">
The URL can be relative, of course, as well as take the absolute form shown here.
What sort of images can be used in backgrounds? In all browsers that can display backgrounds, GIF is supported. JPEG and PNG are supported only in certain browsers, although this is expected to change (for the better) in the near future. As always, then, for maximum compatibility, use GIF.
Of course, background images can be any size, and in any proportion.
If you wanted to create a left-border effect, you could simply create a graphic about fifteen hundred pixels wide and only a few pixels tall. This would be repeated vertically. Of course, if the browser display window were somehow widened past fifteen hundred pixels, the background image would tile horizontally as well, but not too many users will stretch their windows that far (in fact, few are even able to do so). This has the obvious drawback of forcing the browser to download a large graphic and tile it so that large portions of the image are 'off-screen,' but that's the price your users will have to pay.
Since you can mess around with the background color and patterns, it makes sense that you can do the same with the color of various types of text. Using BODY attributes, it is possible to set the color values of ordinary text (using text), the text of hyperlinks (link), the text of already visited links (vlink), and the color which the browser uses to highlight a link when it's selected by the user (alink, which stands for "activated link").
Each of these attributes can be given the same values as those used for bgcolor-- that is, a hexadecimal number or named color. So, to set up a page with a black background, white text, and light blue links, the markup would be:
   <BODY bgcolor="#000000" text="#FFFFFF" link="#90C8DB">
     or
   <BODY bgcolor="black" text="white" link="cyan">
Since the coloring of visited links is unspecified, the actual color displayed is left up to the browser. For most people, this will be purple, since that's the default Netscape color, but your display may vary.
Remember the warning about background colors and how they aren't always the same on different platforms? Unsurprisingly, the same holds true for text colors, as they're based on the same notation.
Okay, so now we can change the colors of everything. Cool, huh?
Well, yes and no.
I'd like to point out a few things regarding this ability. It can be very, very easily abused. Truly ugly pages are now within anyone's reach. Confusing or frustrating navigation paradigms are just a few keystrokes away. It isn't as dangerous as, say, nuclear weapons technology, but it can make the Information Superhighway as annoying as the term itself.
Let's take an easy example. Suppose you set a page up so that all the links, both active and visited, are colored black, the same as the normal text. Therefore, when a user reads the page, they have no way of seeing at a glance where the links are. (Remember that many users turn off link underlining, relying instead on link colors to guide them.) This could possibly be useful in certain limited cases, but the odds are that it's a bad design choice.
Of course, the same could be done with the background also set to black, which would make the text fairly hard to read. Other, less appealing possibilities abound as well-- how about peach-colored text with dark purple links on a lime green background? Yuck!
Similar issues come into play with tiled images. In general, it is best to pick an image which is either mostly light, or mostly dark, and set the text color accordingly. If the background image has areas of both light and dark, the text will probably clash annoyingly with the background, making it hard to read in places.
Remember that some users may have their browsers set to use their own colors and ignore yours. So, once again, you can't be sure that the user will see what you do. Also, as a general point, most users have been conditioned to expect that active, unvisited links will be blue, and visited links will be either red or purple. Breaking that paradigm is likely to confuse the user, at least for a few moments. In other words, a page featuring dark orange links which turn pink when followed against a cyan background might not be appreciated by the majority of users.
As always, the choice is yours. You must choose wisely.
Well, now that we've seen ways of spicing up images by adding maps, it's only fair to look at ways of taking text to the next stage. HTML 3.2 has added a number of new tags which are used to control the appearance of text, and most of them are forced, not logical, style tags. Some may feel this is not something for which we should be glad, but the tags are part of the specification now, so let's look at them in more detail.
For the last few years (the lifetime of the popular Web, if you will), text has been fairly boring. Oh, sure, you could boldface it, and headings were usually different size from the rest of the text, but it was all basically the same. Only links looked any different, generally being a different color. But changing the color of non-link text? No way. Until now, that is.
Using the FONT tag, one can alter the color of text, or the size, or both at once. You might think that this tag could also be used to change the actual font-- say, to specify that the text should be displayed in Helvetica-- but this is not the case. Only color and size may be controlled using this tag.
Back in Chapter 1, we talked about how to change the color of text by using the text and link attributes to the BODY tag. These work very well as document-wide settings, of course, but what if you just want to change the color of an isolated sentence or word-- or even a single letter? Using the container <FONT>...</FONT> and the color attribute, you can do just that.
Let's say we want word "maroon" to be colored maroon (makes sense, no?) in the following sentence:
References to Silsby&Clarke are in maroon.
All we need to do is enclose the word "maroon" in a FONT container, using the color attribute. Thus:
References to Silsby&Clarke are in <FONT color="maroon">maroon</FONT>.
Colors may also be specified using the triple-hex notation described in Chapter 1; you may use whichever system is easier for you. The color you specify in a FONT tag overrides any colors you may have set in the BODY tag of the document, so even if you've set the document text to be purple, <FONT color="red">...</FONT> will color red the text contained within. This is true of both regular text and hyperlinks.
As I mentioned, you can also change the size of the text using the FONT tag. This is done using the size attribute. The values of size are the numbers 1 through 7, and also relative values such as +2 or -1.
How do these work? We'll start with the absolute values (1-7). These numbers represent sizes from the smallest (1) to the largest (7), with the default value for normal-sized text being 3. So if you wanted to define little teeny text, like a legal disclaimer or the fine print in a contract, you would use the container <FONT size="1">...</FONT>.
Or, perhaps you want to make some text really big.
You may notice that the scale for FONT sizes is exactly backwards from headings, where the most important (and, therefore, usually the largest) heading is H1. It's a bit confusing, but unfortunately we're stuck with it.
Instead of assigning plain numbers, however, you can assign relative values. For example, let's say you want to make some text two "sizes" bigger than the rest of the text. This would be accomplished by using <FONT size="+2">...</FONT>.
Under normal circumstances, this is equivalent to <FONT size="5">, since 3 (the default) plus 2 equals 5. You can change this as well. Using the empty tag BASEFONT, you can set the size which is used as the default text size. The values are 1-7, the same as the absolute values for FONT size. So, if you want a document where the text is a little bigger than usual, you could use <BASEFONT size="4">.
This will have the effect of not only changing the default text size, but of shifting the actual size of FONT tags which use relative values for the size attribute. For example, the container <FONT size="+2">...</FONT>, in a document with a BASEFONT of 4, will effectively define text of size 6 (4+2=6).
You can see that using relative sizes is often advantageous, since it lets you preserve the relative sizing of text even if you start fiddling with the BASEFONT value.
What happens if the combination of BASEFONT and relative sizing pushes the size above seven, or below one? After all, <BASEFONT size="5"> and <FONT size="+3"> equals 8, does it not? As with so many other things, what happens at this point is more or less browser dependent. Some browsers will render the text as even bigger than text of size="7", while with others the sizes of 7 and 8 will be the same. It's pretty much universal, though, that values of less than one are rendered as size="1".
And yes, you can put these FONT attributes together, so that a word can really stand out:
It's up to the author to decide if such a combination is desirable. Also remember that not every browser will recognize the word "maroon," even if the FONT tag is understood.
In addition to the forced style effect of FONT, there are some other style tags. Let's go through them quickly.
The BIG and SMALL containers do about what you'd expect. Text enclosed in <BIG>...</BIG> gets bigger, and text in <SMALL>...</SMALL> gets smaller. By how much? Most browsers make size changes equivalent to <FONT size="+1"> and <FONT size="-1">, respectively. It need not always be so, however; with some browsers, the user gets more control than that. Therefore, BIG and SMALL cannot be guaranteed to be one-step changes in font size.
<SUB>...</SUB> and <SUP>...</SUP> are used to subscript and superscript text, so footnotes and chemical formulas are easier to display.
Not much more to say about them, really.
In a move sure to warm the hearts of lawyers everywhere-- refrain from the obvious jokes, please-- HTML 3.2 allows for the definition of strikethrough text. <STRIKE>...</STRIKE> is what causes this.
STRIKE may be supplanted by the more concise <S>...</S> in the near future, but there's no way to be sure. Netscape 2.0 and later already recognize both strikethrough tags, and the <S>...</S> construct is under consideration by the standards committee.
Speaking of things covered in previous works of mine, the ISO Latin-1 character entities have a few new text entities-- three, to be exact. These are:
That's all. But wait! The chapter isn't over yet...
Horizontal rules, that is. Quite a few attributes were added to the venerable <HR> tag, giving the author much more control over the appearance and placement of a horizontal rule (which I sometimes refer to simply as a "rule"). It's fair to warn you that in discussing them, I'm going to be showing a lot of different horizontal rules, which will make this section of the chapter look a bit fragmented.
The easiest attribute to start with is noshade. Using the noshade attribute, the "engraved" look of most browser's horizontal rules is abandoned in favor of a plain black line. Visually, this is sometimes desirable to an engraved line, which is classy and elegant but sometimes a bit too subtle.
<HR noshade>
Now let's say you want a nice, thick, solid line instead of the thin line most browsers will generate by default. You can increase the line's thickness using the size attribute. size is generally expressed in terms of pixels, so size="7" would create a horizontal rule seven pixels thick.
<HR noshade size="7">
Of course, the size attribute can be used regardless of the shading. Most browsers will display the following as an "inset" box running the width of the browser display window:
<HR size="10">
Okay, so we can increase the rule's vertical size. How about decreasing the horizontal size? It's easy to do if you use width, which can be expressed in two ways: as pixels or as a percentage of the display area. If, for example, you want a horizontal rule which is exactly 275 pixels wide, it would look like this.
<HR width="275">
The thing to remember here, though, is that not every browser window will be the same size. Therefore, on some screens the above rule will look like it's a little more than half the width of the display window. On others-- those running on Sun SparcStations, for example, or on those computers where the browser window to full-screen size-- the HR will look much skinnier in comparison to the size of the window.
You can get around this by using percentages instead. If you want a horizontal rule which is three-quarters as wide as the window itself, the following will do nicely:
<HR width="75%">
That way, no matter how narrow or wide the browser display window gets, the horizontal rule will always be seventy-five percent as wide as the display window itself.
Now that horizontal rules can be smaller than the window size, it makes sense that we should be able to assert more control over how they are placed. Perhaps unsurprisingly, this is accomplished using the align attribute. There are currently three possible alignments: left, right, and center. Let's take the last example and make a rule 'grow' from the right margin:
<HR width="60%" align="right">
By combining size, width, and align, some interesting effects are possible.
<HR size="10" width="20" noshade align="left">

<HR size="10" width="10" align="center">

<HR size="1" width="90%" noshade align="right">
As of this writing, there is no way to change the color of a horizontal rule using standard HTML.
Now that we've gone over ways of specifying document-wide behaviors, let's take a look at the ways in which you can do nifty things with structural elements within the document. This includes things like centering and general element alignment, ways of altering the appearance of lists, and embedding objects.
In HTML 2.0, the align attribute was used with the IMG tag, and not much else. Under HTML 3.2, lots of elements can be aligned, including paragraphs and headings.
Aligning is quite simple; all you have to do is add an align attribute. For now, align has three possible values: left, right, and center. Support for justify, which will force the text to line up along both the left and right margins, is planned for the future but not part of the specification. The default alignment for any element in a Western-language document is align="left".
The markup for a centered paragraph would be <P align="center">, and a right-justified Heading 1 would be <H1 align="right">. Any of these containers is closed with the usual end tag, so <P align="right"> would be ended with </P>. The end tag both ends the paragraph and the centering, so that's all you need. As an example:
   <P align="center">
   <B>Centered text.  Cool!</B>
   </P>
Centered text. Cool!
It is, however, a bit tedious to put an align attribute in every paragraph and other element you want to have centered, especially if you're trying to center the whole document. Fortunately, you don't have to do this; instead, you can put a DIV tag around everything you want to have centered and give that container the align attribute. For more detail on DIV, we press on...
Unlike the metaphorical house to which Abraham Lincoln referred, divided documents can stand quite well, and may even improve from the operation. Let's take a look at how it's done before we worry about the reasons for doing so.
An author may create divisions of a document by using the DIV tag. DIV is a container, and the rules it asserts hold true throughout the container. One of the main attributes of DIV is align. Therefore, using DIV, the author can center several paragraphs and other elements using this single container.
   <DIV align="center">
   [.....lots of text contained in several paragraphs...]
   </DIV>
As I mentioned in the section on align, right justification is also possible, and full justification (getting the text to line up with both margins) is on the drawing boards.
Centering can be accomplished in another way: the CENTER container. First introduced by Netscape, CENTER has the sole effect of centering anything between <CENTER> and </CENTER>. In terms of what the user sees, this is no different than using <DIV align=center>. Using either construct is legal under HTML 3.2, since both tags are part of the specification. The drawback to CENTER is that it has only one possible use, whereas DIV is a more general construct, since it allows for multiple attributes. I tend to prefer using DIV, but that's a personal preference.
| CHAPTER 4: Lists |
There are three main types of lists. I've included the heading here because lists are basic text structures -- they just need a lot more explanation. That's what you'll find in the next section.
While simple in concept, lists can be very powerful in execution. There are three types of lists: unordered lists, ordered lists, and definition lists. The first two are very similar in structure, while definition lists have a unique setup.
The term "unordered list" may be a bit unfamiliar to you, but odds are you've heard of the "bullet list." That's exactly what an unordered list is -- a list of items, each one preceded by a "bullet" (a distinctive character; typically, a small black circle).
The list begins and ends with the tags <UL> and </UL> respectively. Each item in the list is marked using the <LI> tag, which stands for "List Item." <LI> has a corresponding </LI>, but this closing tag is not required to end the list item (although you could use one if you really wanted to). You can use as many list items as you like, up to your browser's built-in maximum, if any.
Here's the markup for a simple list:
   <UL>
   <LI>Monday
   <LI>Tuesday
   <LI>Wednesday
   <LI>Thursday
   <LI>Friday
   </UL>
If you loaded an HTML page containing the markup above, you would see the days of the week, each one preceded by a "bullet." like so:
Almost anything can be put into a list item -- line breaks, entire paragraphs, images, links, or even other lists. For example:
   <UL>
   <LI>Monday
   <LI>Tuesday
   <LI>Wednesday
     <UL>
     <LI>6am - 9am
     <LI>9am - 12n
     <LI>12n - 3pm
     <LI>3pm - 6pm
     </UL>
   <LI>Thursday
   <LI>Friday
   </UL>
In the above case, under "Wednesday" in the 'outer list,' you would find another unordered list (the three-hour blocks of time), which is referred to as a nested list. (In the markup above, I have indented the nested list for purposes of clarity; this is not required for the lists to work. Remember what I've said about whitespace...) Here's how it looks:
In theory, you could probably nest lists indefinitely, but a bit of restraint is called for. Don't nest them too deeply unless you absolutely have to, if for no other reason than aesthetics. Nesting lists too far can look pretty bad.
On the face of it, ordered lists look a lot like unordered lists, and a lot of the same rules apply to both constructs. The only difference in HTML is that instead of using <UL> and </UL>, an ordered list is contained within the tags <OL> and </OL>. Ordered lists are based on list items, just as unordered lists are.
However, when an ordered list is displayed in a Web browser, it uses an automatically generated sequence of item markers. In other words, the items are numbered. The markup for a simple ordered list, based on the first example in this chapter:
   <OL>
   <LI>Monday
   <LI>Tuesday
   <LI>Wednesday
   <LI>Thursday
   <LI>Friday
   </OL>
The above markup will look similar to the previously discussed simple unordered list, with the important difference that each day of the week is numbered instead of preceded by a "bullet." In other words, it looks like this:
Ordered lists are as nestable as unordered lists, and you can nest unordered lists in ordered lists, as well as the other way around. This can get pretty complicated, but sometimes it's what you need.
As you might expect, definition lists begin and end with the tags <DL> and </DL>. However, unlike the unordered and ordered lists, definition lists are not based on list items. They are instead based on term-definition pairs.
Here's the markup for a basic definition list:
   <DL>
   <DT>Do
   <DD>a deer, a female deer
   <DT>Re
   <DD>a drop of golden sun
   <DT>Mi
   <DD>a name I call myself
   <DT>Fa
   <DD>a long, long way to run
   <DT>Sol
   <DD>a needle pulling thread
   <DT>La
   <DD>a note to follow so
   <DT>Ti
   <DD>a drink with jam and bread
   </DL>
A good way to think of it is that <DT> stands for "Definition-list Term" and <DD> stands for "Definition-list Definition." When the above list is displayed, it arranges the elements such that each term is associated with the corresponding definition. The exact arrangement of elements may vary from browser to browser. Here's how the above markup comes out:
Similar to ordered and unordered lists, definition lists can be arbitrarily long. Almost any structure can be placed in a <DD> tag, but putting large-scale structures (such as paragraphs, headings, and other lists) in the <DT> tag is not legal, according to the HTML Specification 2.0. You can leave out one part of a DT-DD pair, but this is not recommended.
Definition lists are perfect for creating glossaries. For example, the Beginner's Web Glossary on our server is simply one relatively long definition list.
There is one attribute to the <DL> tag, which is compact. This causes the display of the definition list to be compacted. What does that mean? It means that the information contained in the <DD> will be displayed on the same line as the <DT> term, if possible. (By the way, Microsoft's Internet Explorer does not support this attribute, so the examples in this section aren't going to work if you're using Explorer.) The markup would start out:
   <DL compact>
   <DT>Do
   <DD>a deer, a female deer
   <DT>Re
   <DD>a drop of golden sun
   .....
...and the entire compacted list would look a bit different than the first definition-list example. Thus:
Pretty neat, eh? One word of warning, though: this will only work when your terms are short enough to allow the definition to appear on the same line. If the term is too long, the definition will start on the next line, just as they would in an uncompacted list. Here's an example:
In the first case, the term "1." is so short that there is no problem with starting the definition on the same line as the term. In the second case, however, since the term is so long, the definition is forced to start on the next line.
In the next chapter, we'll see out how to spice up text even more by using what I refer to as "special-effect" tags.
Okay. As an example, let's say you're compiling a glossary. You decide to write a definition for "Web client" which reads, "see browser". Instead of leaving it as plain text, thereby forcing the user to scroll most of the way through the glossary to find "browser," you could set a named anchor around the term "browser" and then turn the word "browser" in the definition for "Web client" into a hyperlink to the label gl.browser-- and therefore to the term "browser." Got all that? In other words, the markup used to create the entry for "Web client" would be:
     <DT>Web client
     <DD>see <A HREF="#gl.browser">browser</A>
Meanwhile, the markup for the "browser" entry would be:
     <DT><A NAME="gl.browser">browser</A>
     <DD>A program which is used to access the Web.
The user, reading through the glossary, sees the definition for "Web client." He clicks on the hyperlink in the definition (the word "browser"). This causes the browser to jump to the entry for "browser" -- no scrolling required!
Remember plain old boring ordered and unordered lists? They've gotten a bit of a life in HTML 3.2, thanks to some new attributes.
To begin with, the "bullets" in unordered lists can be modified by using the type attribute. Legal values for type in this circumstance are circle, square, and disc. Let's say you want your bullets to be squares instead of the usual filled circles.
Note that the Windows95 version of Microsoft's Internet Explorer may not render the squares. I don't know why this is, but I've received reports to this effect, so if you're using MSIE, you may not see squares.
The markup to accomplish this effect is:
   <UL type="square">
   <LI>Monday
   <LI>Wednesday
   <LI>Friday
   </UL>
You can also set the type of individual list items as follows:
Markup:
<UL> <LI>Monday <LI type="square">Tuesday <LI>Wednesday <LI>Thursday <LI>Friday </UL> |
Result:
|
In most browsers, setting the bullet type of an item will cause all items after that to have the same type, which is the behavior called for by the HTML specification. Therefore, if you just want one item to have a different type, it should be done like this:
Markup:
<UL type="circle"> <LI>Apples <LI type="square">Bananas <LI type="circle">Oranges <LI>Mangoes </UL> |
Result:
|
The reason to assert the type in the UL tag is to ensure that all of the items' bullets (besides the square, of course) will be the same.
Ordered lists also allow alternate display types. In addition to the usual numbers that count from one to infinity, you can specify the use of letters or Roman numerals, in either upper or lower case.
Let's say you want a list of items which are marked A through F, rather than 1 through 5. Using the type attribute, it's no problem at all. While this is similar to the way type is used in unordered lists, the value is obviously different. For example:
Markup:
<OL type="A"> <LI>January <LI>February <LI>March <LI>April <LI>May </OL> |
Result:
|
If you wanted to use lower-case letters instead of upper-case, then you would use the tag <OL type="a"> rather than the 'A' shown above. This is one of the few cases in HTML where capitalization actually counts for something. Similarly, Roman numerals are specified using the values I or i, depending on which capitalization style you're after. Here's an example of lower-case numerals:
Markup:
<OL type="i"> <LI>Acknowledgements <LI>Publisher's Note <LI>Author's Note <LI>Foreword <LI>Introduction </OL> |
Result:
|
It's possible to switch styles in the middle of a list as well. For example, let's say you want a list that counts from 1 to 3, switches to small letters for the next four items, over to upper-case Roman numerals for two items, and then back to regular Arabic numbers for the end of the list. Here it is:
Markup:
<OL> <LI>January <LI>February <LI>March <LI type="a">April <LI>May <LI>June <LI>July <LI type="I">August <LI>September <LI type="1">October <LI>November <LI>December </OL> |
Result:
|
The type="1" sets the display to ordinary numbers. Note that the numbering is not reset with each style change. Each item's number is merely "translated" into the appropriate style, where necessary. Therefore, the seventh item above is "g," which is the seventh letter of the alphabet. The next item is "VIII," which is eight in Roman numbering.
You can also fiddle with the actual numbers that are displayed. This is done by setting a start number, or by setting the value of an item in the list. Let's start with start, since that somehow seems to make sense. By setting the start attribute in the OL tag, the list will start with a number other than one.
Markup:
<OL start=5> <LI>Bob <LI>Carol <LI>Ted <LI>Alice <LI>Mortimer </OL> |
Result:
|
On the other hand, you may want to assign a specific value to an item in the list. If you do so, then the items which follow will be numbered based on the value you assign. Therefore:
Markup:
<OL> <LI>Bob <LI>Carol <LI value=7>Ted <LI>Alice <LI>Mortimer </OL> |
Result:
|
As you can see, the item is set to the given value, and the items after that are numbered sequentially, using the specified value as a "base."
You can set values for one, some, or all of the items in the list. Therefore, in order to create a descending-order list (like a Top Five list, let's say), you will have to explicitly set the value of each item, as follows:
Markup:
<P>Top Five HTML Mistakes:</P> <OL> <LI value=5>No SGML prologue <LI value=4>Multiple line breaks <LI value=3>Badly defined frames <LI value=2>Not closing paragraphs <LI value=1>The BLINK tag </OL> |
Result:
Top Five HTML Mistakes:
|
As of this writing, both start and value must be given a number as a value, as opposed to a letter or Roman numeral. Therefore, <LI value="G"> is not legal, even if the display type has been set to upper-case letters. Be careful, and be aware that this could change over time.
Now it's time to tackle a complicated new structure in HTML-- tables. This will require two chapters to finish, so you might want to grab some snacks or go to the bathroom first. No, no, go ahead, I'll wait...
| CHAPTER 5: Images |
Besides hyperlinks, the other great advantage of the Web is the ability to integrate graphic images into a document. Some would argue that this represents one of the greatest strengths of the Web. Graphics are certainly used as heavily as hyperlinks, and represent most of the data which is transferred, so it's fitting that we spend some time discussing them. By the time you finish this chapter, you'll be able to create eye-catching pages that will make you the envy of your friends! Okay, so that would be the case if you had friends like mine. Never mind.
Images are placed in Web documents using the IMG tag. This tag is empty, and therefore has no closing tag. The basic form of the image tag is <IMG>, but just like <A>, <IMG> by itself is pointless-- it will do nothing. At the very least, you need to let the browser know where to find the image that it's supposed to place in the document.
This brings up an important point. Visually speaking, images are part of a Web document, but in reality an HTML file and any graphics it refers to are actually all separate files. In other words, one HTML file which has five graphics within it makes a total of six files required to make the page look right. These files are all stored on a Web server, but don't have to all be in the same exact place. (Often, server administrators will set up separate directories for pictures.)
In order to make the IMG tag work, you need to use an SRC attribute. SRC stands for "source," as in, "the source of this graphic." (One way to read a typical image tag is "image source equals..." You'll see what I mean in a minute.) The value of SRC is the URL of the graphic you want to have displayed on your Web page. Thus, a typical image tag will take the form:
<img src="URL of graphic">
The URL of the graphic is just like the URLs used in the anchor tag (see previous chapter), except in this case the location used is that of the graphic file. A graphic named "blat.gif" located in the directory "pics" on the server "www.site.edu" would have the URL http://www.site.edu/pics/blat.gif. You can use either relative or full URLs to refer to the graphic file.
Okay, but how does the browser know where to put a graphic once it's been loaded? In relation to the text, the browser puts a graphic wherever an image tag occurs in the document. It will do this as though the graphic were just another piece of the text (which, in a certain way, it is). For example, if you put an image tag between two sentences, the browser would show the first sentence, then the graphic, and then the second sentence right after the graphic. Thus...
     Further inquiries should be directed to Jodi at x303.
     <img src="pix/redsquare.gif">
     There will be a meeting next Tuesday night...
...will look like this:
Further inquiries should be sent to Jodi at x303.There will be a meeting next Tuesday night...
Images can be placed almost anywhere within the body of the document. They can be between paragraphs, within paragraphs, in list items or definition-list definitions, and even within headings.
Placing images within links is also possible. To do so, merely place the IMG tag within the anchor container. For example:
     <A HREF="http://www.site.net/">
     <img src="generic-image.gif">
     </A>
You can also mix in text to either side of the image, or both sides: it doesn't matter. Let's say that you wanted to put a link to a copyright notice, and you wanted to draw attention to the link with a small warning symbol. It might go something like this:
     <A HREF="tcopy.html">
     <img src="pix/warning.gif"> Unauthorized duplication is prohibited!
     </A>
The above markup would then appear as:
Unauthorized duplication is prohibited!
As you can see, if you do include text within the anchor container, then it will be a part of the anchor along with the image.
There are two other attributes to the IMG tag which should be discussed in this tutorial. Both are less frequently used than SRC (because SRC is so essential) but each is important in its own way. In my opinion, the more important of the two is...
The ALT attribute is used to define "alternate text" for an image. The value of ALT is author-defined text, enclosed in double-quotes, and ALT text can be any amount of plain text, long or short. To pick one of an infinite number of examples, a warning symbol could be marked up as follows:
<img src="warning.gif" ALT="Warning!!!">
This ALT text will have no effect whatsoever in a graphical browser with image loading turned on. So what's the point? ALT improves the display and usefulness of your document for people who are stuck with text-only browsers such as Lynx, or who have turned image loading off. Since these users cannot see graphics, the browser will substitute a marker such as "[IMAGE]" for any image tag. This is, in effect, a placeholder, but a frustrating one, since there isn't any way for the user to tell what the image is, or what it says, or what its purpose is.
However, if ALT text has been defined, the browser will display that text instead of the placeholder. This makes the display a lot nicer and more useful for users who can't see the graphics, and doesn't affect users who can see graphics at all. A common trick to make image placeholder disappear in text-only browsers is to set the ALT text to be a single space:
<img src="generic-image.gif" ALT=" ">
Some people also use no space at all (ALT="") but this particular use of the ALT tag has been known to confuse certain Web browsers, including some older, but still common, versions of Netscape. For maximum safety, use the single-space ALT text.
Figure 1 shows two Lynx (text-based Web browser) screen-shots. The first (Figure 1a) is of a document with a number of images that have not had any ALT text defined. The second screen-shot (Figure 1b) is the same document, but this time the images have been enhanced with ALT text. Notice how the use of ALT tags significantly reduces the "clutter" in the document.
![[Figure 1: Lynx screens both with and without the use of ALT text.]](images/TCh7Fig1.gif)
In addition to character-based browsers, some graphical browsers will use the ALT text if automatic image-loading has been turned off. Therefore, ALT is really more of a consideration to the reader than it is a necessary component of the image tag, but it is still important to the design of any intelligently constructed Web page.
A lot of vertical space can be wasted when graphics are integrated into paragraphs. This is because ordinary HTML 2.0 does not support anything which allows for multiple lines of text flowing past a graphic.
However, the text can be shifted within the vertical space which is created by the graphic. In addition to having the text lined up with the bottom of the graphic, you can align it to either the top or the middle of the graphic. This is accomplished using the ALIGN attribute, as in the following:
<img src="generic-image.gif" ALIGN=top>
This will cause the top of any text on the same line as that graphic to be aligned with the top of the graphic. There is also an ALIGN=middle option, which will align the text's baseline with the middle of the graphic, and of course ALIGN=bottom, which is the default display strategy for most browsers.
While the above is all true for HTML 2.0, it is also the case that the HTML 3.2 specification supports the flowing of text around graphics (that is, allowing multiple lines to wrap around a graphic). The ability to flow text around a graphic is accomplished through the ALIGN attribute.
Before you go flying off to create the ultimate killer graphic, you need to remember that the "universal" standard (at least for the near future) is the GIF file format. GIF stands for Graphic Interchange Format, and all graphical browsers use that format for in-lined images. While this may change to some degree in the future, for now, my advice is to use GIF files in order to ensure maximum cross-browser compatibility.
Most advanced graphics programs will save to the GIF format. If they do not, they will usually save to a format like PICT or PCX, which can then be converted using another program. If you are not sure how to get your graphics into the GIF format, ask your local computer graphics whiz.
As you have probably guessed, a discussion of graphics could fill up its own tutorial-- there are issues like file sizing, when to use GIF and when to use JPEG, transparent areas, future development, and image mapping, just for starters.
Unfortunately, I haven't enough room in this tutorial to tackle this subject. Besides, most of it isn't about HTML, but more about style decisions, which is outside the scope of my intent for this work. There are some good style guides available; see Appendix C for some possibly useful links. I hate to leave you hanging like this, but as Dirty Harry once said, "A man's got to know his limitations." Sorry.
Of all the HTML 2.0 tags, the venerable IMG may have gotten the most dramatic upgrade. In all, there are six new attributes for IMG, and one of the old attributes was made much more powerful. We'll start with the old-made-new, take a side trip to another tag's new attribute, and then dive into the completely new attributes for IMG.
You remember align, don't you? It let you determine how text will be vertically aligned with an image contained in the same line-- top, middle, and bottom, among a few other values. Well, there are two new values for align: left and right. These are what you use to let text flow around an image [Figure 2.1].
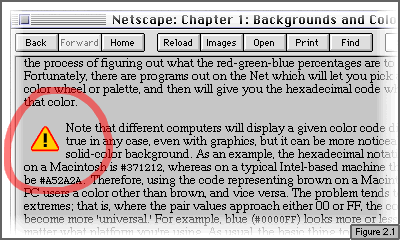
That's rather a dramatic shift, isn't it?
Under these circumstances, the image becomes what's called a "floating image." This term is derived from the idea that an image "floats" down to the next line of text and over to whichever margin is defined by align (right or left), and any subsequent text flows around it. So align="left" would cause the image to float down and over to the left margin, and the text would flow around it to the right. Figure 2.2 show a side-by-side example of a regular image, and then the same graphic as a floating image.
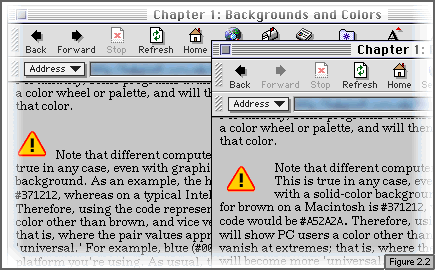
Okay, what's all this about floating down one line? This happens in circumstances where the image would ordinarily not be placed against the defined margin. For example, if you put a floating image into the middle of a line of text, instead of being displayed partway across the page, the image will float down one line of text and over to the appropriate margin.
If you put the image at the beginning of a paragraph and float it to the left, the paragraph text will begin near the top of the image in question, and to the right side of it, as shown in Figure 1. If you put the image tag inside the paragraph text-- even after a single letter-- it will float down one line and over to the left [Figure 2.3].

This "floating" behavior is what causes the first line of text in the paragraph to be above the image, and not beside it. Again, this has happened because the image tag is somewhere with in the text of the paragraph-- say, after the word "computers," or between the first and second letters of the sentence. Therefore, care should be taken with the placement of floating images.
This does bring up a small wrinkle, however. The problem here is that everything-- text, horizontal rules, other images-- will flow around a floating graphic. What if you want to make sure that certain text starts after the floating graphic?
Ending a paragraph won't work, and neither will a single ordinary line break. You could put in a string of multiple line breaks, but that's not a very good idea-- what if the breaks go too far, leaving you with a lot of ugly blank space? Worse still, what if the browser is one of those which treats line breaks as whitespace and therefore collapses multiple breaks down to a single break?
What you need is a way of saying, "Insert a break here which will cause anything after it to start on the first line with a margin clear of this floating image." Fortunately, you have exactly that in the form of a new attribute for the BR tag: clear.
clear has three possible values: left, right, and all. If, for example, you want to make sure that you break past an image which has floated to the left, you would use <BR clear="left">. Starting on the first line with a clear right margin would employ <BR clear="right">, and if you want to start subsequent material on a line which has both margins clear of floating images, use <BR clear="all">. That's clear enough, isn't it?
Sorry. On to the new attributes for IMG!
Of course, in the process of floating an image, you may find that the text is snuggled up just a little bit too closely to the edges of your image. You can't use a text-space to keep the text away-- the image isn't really located next to that space any more!
Not to worry. Thanks to hspace and vspace, you can give your images a bit of breathing room. hspace and vspace stand for "horizontal space" and "vertical space," respectively. Both attributes are measured in pixels, and negative values are not permitted-- only positive integers.
Let's say you want to make sure your image has a minimum of ten pixels of blank space to either side of it. The markup would go something like this:
<img src="image.gif" align="left" hspace="10">
This will add 10 pixels of blank space to the left and right of the image. Note that in the above case, not only will this markup push any text 10 pixels away from the image, but it will push the image ten pixels away from the left margin. Here's a comparison:
No hspace attribute
hspace="10"
Similarly to hspace, vspace adds blank space to the top and bottom of an image. If you wanted six pixels of space above and below the image, then the markup would resemble:
<img src="image2.gif" align="right" vspace="6">
Getting six pixels of space all the way around the image would require:
<img src="image2.gif" align="right" hspace="6" vspace="6">
This usually brings up the question, "How do I simply add space to one side and not the other?" You can't-- not in HTML. You could create an image with some blank space built in, or you could wait for style sheets, which should offer this sort of capability. In plain old HTML, however, you can add space to both side margins, or above and below, or both. That's all.
Incidentally, you can use hspace and vspace on ordinary, non-floating images. It's simply much more common to use them on floating images.
You might think, upon first impulse, that border is a way to set blank space all the way around an image... but no. I wasn't lying in the last section when I said that you can't do that with HTML. border instead draws a visible border around the image. The value of border is the number of pixels thick you want the border to be.
Let's say you set the value of border to be 5. You'll get:
<img src="warning.gif" border="5">
Ick. Not very pretty, is it? And you can't even set the color of the border. You can make the border go away, though.
Once again, I hear the rustling of nonplussed users. Wait! Maybe this will interest you: if you have an image which is part of a hyperlink, setting border to 0 will make the highlight disappear! Here's the difference:
   <A HREF="legal.html"><img src="warning.gif"></A>

   <A HREF="legal.html"><img src="warning.gif" border="0"></A>
They both link to the same document... but one looks kind of ugly, and the other doesn't.
This effect is most often used to make rectangular, 3-D buttons look like buttons imbedded in the page, not like graphics with colored borders around them, with the colors changing from blue to red (or worse, from user-defined color to user-defined color) all over the page and ruining the delicate color balance the graphics create. Unsurprisingly, corporate sites love to use this trick.
Very important among the new attributes are height and width, both of which are measured in pixels. With these attributes, you can define the size of an image right in your HTML document. Let's say you have an image called icon.gif which is 50 pixels wide and 30 pixels tall. The markup for this image would be:
<img src="icon.gif" height="30" width="50">
Thus, when the document is loaded, the browser will actually know the dimensions of the image before it loads the graphic file!
All right, I realize that this may not seem like a big deal at first, but honest, it is. Let's look at the advantages first.
When you look at any Web page with even small numbers of images, realize that the vast majority of the data on that page is the graphics. Text takes up a lot less data room than images do. For example, a document which takes up roughly a single printed page, including markup, probably represents no more than 3KB of text. Four small pictures and a toolbar could easily total over 20KB (depending on the pictures). If your page has a lot of graphics, you could be looking at 4KB of text and 200KB of images, if not more. Obviously, it's a lot easier and faster to get text than it is to get images.
I'm probably not telling you anything you don't already know. Consider this, though: what happens if you're loading a page from overseas and it has graphics sprinkled throughout the text? In most browsers, the page loads to the point where it hits an IMG tag and then drops everything in an attempt to load the image. You're left looking at the first few paragraphs of the document while you wait for your browser to finish loading the image. Once it's done so, it goes back to loading text-- until it hits another image, at which point everything stops dead once again, forcing you to wait until that next image has been loaded. And so on.
However, if the browser understands height and width, and you've used them, then it doesn't have to wait for those images. It will keep loading text and leaving open blank areas based on the values of height and width. Then, once the page is loaded, the browser goes back and starts filling in those blank areas with images. In the meantime, you can be reading through the document, and perhaps moving on to another one, without having to wait for all those images.
As an author, height and width may seem like an annoyance. To the reader, however, they're a godsend. No more waiting for big, flashy graphics before being permitted to view the actual content of the page! What a concept! If the author has used height and width, this is possible. Therefore, use of these attributes should be regarded as a courtesy to your readers.
One thing you may be tempted to do is resize graphics using the height and width attributes. Please don't. In the first place, only browsers which support these attributes will do the resizing, so if it's important to have the graphic be a certain size, produce a version at that size. More importantly, the usual application of this technique is to make graphics smaller. This forces the reader to download a large graphic only to have it show up small on his screen. Why make the user wait? Produce a small graphic which is quick to download instead.
Multimedia
Here is an example of how to insert a multimedia file in your HTML document:
|
To embed a single file: auto start (start on page load ) It is hidden and repeats. <embed src="http://YOUR URL.mid" autostart="true" hidden="true" loop=true>< To change this so that it does play automatically in page load:
To change this so that it only plays once:
Allowing Users to Control the Music:
<embed src="http://YOUR URL.mid" height=16 width=47 autostart="true"
controls="smallconsole" loop="true">>
|
| CHAPTER 6: Tables |
All right, it's time to learn about tables! This subject will take two chapters to get through. The first of the two chapters-- that's this one-- will explain how tables are constructed and introduce all of the tags related to tables. The second chapter will discuss in gory detail the various attributes you can add to the tags, and how they can be used to create some very interesting effects.
To start with, tables are containers, so a truly minimal (if useless) table would have the following markup:
   <TABLE>
   </TABLE>
Okay, okay, it's boring, but it made the point, right? Right. All other table elements will go between those two tags. That's simple enough, isn't it?
Before we go any farther, I'm going to mention an attribute of the TABLE tag which gets a lot of use. Ordinarily, a table will be rendered without any borders, so that the data is arranged in discrete cells, but the cells themselves can't be seen. This can be useful, but most of the time, it helps to be able to see the actual structure of the table. To do this, just add the word border to the TABLE tag, so that the opening tag looks like this:
<TABLE border>
This isn't the only attribute to TABLE, but the rest will wait until the next chapter. I only bring border up now because I'm going to be using it a lot in this chapter, and I thought you should know ahead of time what was going on.
Okay, back to the theoretical discussion. Each table is divided into rows, and each row is divided into a number of cells. Therefore, when you're planning a table, think of it as having this basic structure:

The next chapter will introduce more specifics (and a few wrinkles) concerning this model, but for now, let's stick with the way of thinking shown in Figure 1. The height of each row, incidentally, is determined by the height of the tallest cell in that row. The browser itself will automatically figure out how tall that is, based on the data it has to display and the way that data has been arranged.
Each row is specified using the "table row" container, comprised of the tags <TR> and </TR>. Therefore, a blank three-row table would be written as:
   <TABLE>
   <TR></TR>
   <TR></TR>
   <TR></TR>
   </TABLE>
This still isn't enough for a useful table, however. Each row needs to be divided into a number of cells.
Note that there is no way to explicitly specify how many cells are in a given row-- that number is implicit in the cells themselves. In other words, if a row container has four cell containers in it, then that row obviously has four cells. And how, you are no doubt asking, does one specify a cell container?
There are two ways, actually, because there are two types of cells: data cells and heading cells. We'll look at data cells first, since they tend to be much more common.
A data cell is specified using the container <TD>...</TD>, and there can be any number of these cells in a given row. The contents of a data cell are generally referred to as "table data," which is where the letters TD come from. Any kind of information-- text, images, and so on-- is considered data for the purposes of tables. Therefore, most of your cells will contain data of one kind or another:
   <TABLE border>
   <TR>
   <TD>one kind</TD>
   <TD>another</TD>
   </TR>
   </TABLE>
| one kind | another |
As you may have guessed, the markup for a table can get to be very large very quickly. If you have a table that is four rows of seven cells each, and your markup looks similar to that shown above (each row tag is alone on a line, and each cell gets a line of its own), then markup for this hypothetical 28-cell table would be 38 lines long! Things get even worse if you have a lot of information in each cell, and if you start throwing in blank lines to make examining the markup easier.
My recommendation is that if you're using a word processor or editor which does automatic indenting, you should use it to the fullest. For example:
   <TABLE border>
      <TR>
         <TD>Row 1, Cell 1</TD>
         <TD>Row 1, Cell 2</TD>
      </TR>
      <TR>
         <TD>Row 2, Cell 1</TD>
         <TD>Row 2, Cell 2</TD>
      </TR>
   </TABLE>
That way, it's easier to get a feel for the table's structure without having to leave yourself a ton of comments.
Data cells can be arbitrarily large, and as I indicated before, a cell can contain nearly anything: text, both regular and monospaced; lists, both ordered and unordered; images of any size; horiztonal rules; forms; and even entire tables! Here's just one possibility:
| This is the first cell. | Cells can contain:
|
Images, too:

|
This is the fourth cell. |
| More text, in this, the sixth cell. | And last. |
For brevity's sake, I have copied the above table to an example page, where you can view it and the markup which went into creating it.
You'll note that in each of these examples, I've made sure that each row has an equal number of cells. This is not required. What happens when rows have an unequal number of cells? Here's one example:
| Row 1, Cell 1 | Row 1, Cell 2 | Row 1, Cell 3 | Row 1, Cell 4 | Row 1, Cell 5 |
| Row 2, Cell 1 | Row 2, Cell 2 | Row 2, Cell 3 | ||
| Row 3, Cell 1 | Row 3, Cell 2 | |||
| Row 4, Cell 1 | Row 4, Cell 2 | Row 4, Cell 3 | Row 4, Cell 4 | Row 4, Cell 5 |
The overall table is always rectangular in shape, so "leftover" space is simply left blank. Nothing will warn you that the table has a ragged edge, so to speak, except checking it yourself. Rows of unequal length are perfectly legal, and sometimes even useful.
You can force blank space to show up at the beginning of, or in the middle of, a row by inserting an empty cell. This is done using the tag sequence <TD></TD>. Let's say that we want the above table to have its rows be "right-justified," in the sense that the blank space is all on the left side of the table, like so:
| Row 1, Cell 1 | Row 1, Cell 2 | Row 1, Cell 3 | Row 1, Cell 4 | Row 1, Cell 5 |
| Row 2, Cell 1 | Row 2, Cell 2 | Row 2, Cell 3 | ||
| Row 3, Cell 1 | Row 3, Cell 2 | |||
| Row 4, Cell 1 | Row 4, Cell 2 | Row 4, Cell 3 | Row 4, Cell 4 | Row 4, Cell 5 |
In this case, the markup for the third row is:
   <TR>
      <TD></TD>
      <TD></TD>
      <TD></TD>
      <TD>Row 3, Cell 1</TD>
      <TD>Row 3, Cell 2</TD>
   </TR>
The "blank" cells take up space in the table's structure, but don't show up in the browser window. This can be pretty handy when you need to set up a complicated table and need separators.
Sometimes, you will want certain cells to stand out, because they contain labels or column titles or something similarly important. For these situations, there is a special type of cell called a "heading." This cell type has different display rules than regular data cells, so that it stands out in the crowd (so to speak). To give you an example, I've set up a table which lists a number of foods and their popularity among a sample audience:
| Food | Like | Hate | Don't care |
|---|---|---|---|
| Pizza | 93% | 4% | 3% |
| Brussels Sprouts | 44% | 47% | 9% |
| Pork Chops | 68% | 15% | 17% |
| Mashed Potatoes | 71% | 24% | 6% |
| Ice Cream | 98% | 1% | 1% |
Now, the text in the first row should look different than the rest of the text-- bigger, maybe boldfaced, perhaps in a different color, but still different. That's because those cells are table headings. This type of cell is specified using the tags <TH>...</TH> (the letters "TH" come from the term "table heading").
How the browser displays table headings will vary; for example, Netscape will boldface and center the text within the cell, whereas Mosaic will let the user define the display strategy. Table headings may be defined anywhere, even in the middle of a row and surrounded by data cells. That's because headings are intended as a structural notation. You can put them anywhere that would make sense, instead of being constrained to the first row or cell, or something like that.
For further examples, you could look through my Table Examples page, which contains some original constructions as well as some specimens I swiped from the Netscape site.
According to the HTML specification, the close tags </TR>, </TD>, and </TH> are all optional, in much the same manner as the </LI> tag is not required. This makes markup quite a bit easier, since you don't have to keep typing all those close tags. In the real world, however, browsers such as Netscape have a much higher chance of getting confused or crashing if you omit these end tags. The one which seems to cause the most trouble is </TR>, so I recommend that you explicitly close all of your table rows, and only close heading and data cells if you really feel like doing so.
Tables can also have a caption associated with them. The text enclosed in the CAPTION tag will be placed at either the top or bottom of the table, depending on what value is given to the align attribute. Let's take the food-survey table from the last section and give it a caption.
   <TABLE border>
   <CAPTION align="bottom">Fig.3: Survey Results</CAPTION>
   [...rest deleted for brevity...]
   </TABLE>
| Food | Like | Hate | Don't care |
|---|---|---|---|
| Pizza | 93% | 4% | 3% |
| Brussels Sprouts | 44% | 47% | 9% |
| Pork Chops | 68% | 15% | 17% |
| Mashed Potatoes | 71% | 24% | 6% |
| Ice Cream | 98% | 1% | 1% |
Note that the CAPTION container can be placed anywhere in the table, as long as it isn't inside a <TR> container. You should also have a maximum of one caption.
When putting together a table, something you need to think about is how the table will degenerate in a browser which doesn't understand tables. Let's say you're trying to look at a page with tables using an older Web browser such as Mosaic 1.0.3, which doesn't understand tables at all. In that case, the table tags will be ignored, as any good Web browser will simply ignore tags it doesn't understand. Therefore, the above food-survey table will look like this:
Fig.3: Survey Results Food Like Hate Don't care Pizza 93% 4% 3% Brussels Sprouts 44% 47% 9% Pork Chops 68% 15% 17% Mashed Potatoes 71% 24% 6% Ice Cream 98% 1% 1%
That's bad enough, of course. It gets worse when you've arranged the data in the table in such a way that it will get hopelessly scrambled in a table-ignorant browser. This is what we call "graceless degradation." The goal, as you might suspect, is "graceful degradation," in which the data is at least displayed in the right order, if not necessarily very attractively-- although that's always nice to achieve as well.
Figuring out how a table will come apart is very simple: the data will be displayed in whatever order it appears in your HTML file. This isn't much of a problem right now, but just wait! Once I get into some of the cell attributes in the next chapter, you'll see that things can become very complicated very quickly. Of course, at that point, I'll explicitly discuss this issue anyway, since I can't very well pass up an opportunity to belabor the obvious.
What we have discussed so far by no means defines the limit of what can be done with tables. In the next chapter, we'll review a number of attributes which will let you create much more interesting and useful tables than the ones we've seen so far.
So far, we've covered the basic structure of tables: Each table is divided into rows, and each row into cells. It gets a lot more complicated, however, because the various table tags have some very powerful attributes. We'll start with the attributes for TABLE, which affect the entire table, and then examine ways of playing around with individual rows and cells.
First off, just how big do these tables get? That is to say, how does the browser figure out how wide the thing should be?
That depends, actually. The easy answer is that the table is as wide as it needs to be to display the longest row. However, what if you have so much data in a row that the table would be several screen-widths across? In that case, browsers usually make the table as wide as the browser dislpay window and just wrap the data in the cells, thereby making the table taller.
Okay, but what about tables that aren't very wide? Or how about making a table skinnier than the data would ordinarily make it? And what about Scarecrow's brain?
Er... never mind that last bit. The point of all this is that while the browser will generally do automatic width calculations, you can explicitly set the width of the table. This is done by using the width attribute. Surprised? I hope not.
width can be expressed in two ways: as pixels or as a percentage of the display area, just like we talked about for horizontal rules. If, for example, you want a table which is exactly 75% the width of the browser window, it would look like this.
   <TABLE width="75%">
   <TR>
   <TD> This table should be 75% as wide as the browser window. </TD>
   </TR>
   </TABLE>
| This table should be 75% as wide as the browser window. |
That way, no matter how narrow or wide the browser display window gets, the table will always be seventy-five percent as wide as the display window itself.
In the last chapter, I mentioned the border attribute, which makes the table's structure visible. However, border is a bit more flexible than I indicated. You can not only use it to make the table visible, but also set the width of the outer edge of the table's border. How?
   <TABLE border="8">
   <TR>
   <TD> A wider border. </TD>
   </TR>
   </TABLE>
This will create a table whose outer border is eight pixels wide:
| A wider border. |
One of the things you may have noticed about tables is that they tend to look a little cramped. The data in each cell is typically scrunched up right against the edges of that cell, and the cells aren't separated by a whole lot of space, either. Fortunately, you have control over these aspects as well.
If you want to increase the amount of space between cell data and the edges of the cell, wouldn't it be nice to pad the cells? That's exactly what you do when you use the cellpadding attribute. cellpadding is measured in pixels, so if you set it to 5, you're specifying a minimum of 5 pixels of blank space between cell data and the cell edges. cellpadding can be set to any positive integer, or to zero.
   <TABLE border cellpadding="10">
   <TR>
   <TD> Cell 1 </TD><TD> Cell 2 </TD><TD> Cell 3 </TD>
   </TR>
   </TABLE>
| Cell 1 | Cell 2 | Cell 3 |
As you can see, this gives the table a more open look, making it easier to read. Of course, that's only true if the border is visible. If the border is off, cellpadding will still add the same amount of space. All of the data will be in exactly the same place it would be if the border were turned on. It just won't have the same visual effect, since the cell borders aren't there.
Similar to cellpadding, cellspacing increases the amount of blank space between the cells in a table. The default cellspacing value for most browsers is 1, but you can change this to be any positive integer (or zero), just like cellpadding.
   <TABLE border cellspacing="10">
   <TR>
   <TD> Cell 1 </TD><TD> Cell 2 </TD><TD> Cell 3 </TD>
   </TR>
   </TABLE>
| Cell 1 | Cell 2 | Cell 3 |
Putting the two together would give us:
   <TABLE border cellpadding="10" cellspacing="10">
   <TR>
   <TD> Cell 1 </TD><TD> Cell 2 </TD><TD> Cell 3 </TD>
   </TR>
   </TABLE>
| Cell 1 | Cell 2 | Cell 3 |
Just as with border, these attributes are applied to the entire table. You can't use either of them on individual table cells. From here on out, we'll talk about attributes which are applied to individual cells or rows.
One fairly simple attribute is nowrap. This attribute has no value, as its sole purpose is to prevent the contents of a cell from wrapping; that is, from flowing from line to line between the edges of the cell.
If you want a cell whose contents won't wrap, simply use <TD nowrap> or <TH nowrap>. It's that simple.
Just to make the point, here are two cells-- one with nowrap and the other without.
| Four score and seven years ago our forefathers brought forth upon this continent... | Four score and seven years ago our forefathers brought forth upon this continent... |
Obviously, it pays to be careful when using this attribute-- a table could get unreasonably wide in very short order.
It's the same width we talked about earlier in the chapter-- it's just that you can set it for individual cells. This is the case with both data cells (<TD width="150">) and table headings (<TH width="50%">) In this case, however, setting a percentage means something slightly different. Let's say that you set a cell width by percentage-- for example, <TD width="20%">. The cell will be twenty percent the width of the table, not of the browser window. If you set the cell width in pixels, on the other hand, it will still be that many pixels wide.
This brings up an interesting question. What happens if a cell is defined, in pixels, to be wider than the table itself? This is the sort of thing that's left up to individual browsers to determine. Some may make the table wider than it's supposed to be in order to accomodate the cell, whereas others may make the cells smaller in order to fit the table. Odds are that the table's width will be increased to accomodate the cell, but there's no guarantee.
Most browsers display table data as left-justified, and centered vertically in the cell. Using align and valign, you can change this. The possible values for align are left, right, and center, whereas valign may be top, middle, or bottom. These attributes may be combined, so if you wanted a cell whose data is pinned to the top right corner, the markup for that cell would be <TD align="right" valign="top">.
Both attributes can also be applied to entire rows. <TR align="center"> will center the data in every cell in the row. If any of these cells have a differing alignment, however, that setting will override the row's alignment value. Therefore, the following fragment of table code:
   <TR align="right">
   <TD> Row default <TD align="left"> Left <TD> Another default
...will result in this:
| Row default | Left | Another default |
You cannot, sad to say, set the alignment (in either direction) of cell contents for an entire table. The 'largest' structure to which align and valign may be applied in this manner is a table row.
However, if you do use align as an attribute of a TABLE tag, it will have an effect. The effect it will have is the same as it would for an image. <TABLE align="right">, for example, will 'float' the table to the right margin and allow the document text to flow around it. Here's an example:
| This table has been aligned to the right, and the other text should be flowing past it. |
Here is some text which will flow past the table at right, assuming that your browser understands HTML 3.2. This is the sort of thing you can expect to see rather frequently on the Web, as it allows authors to create asides, sidebars, quote-boxes, and other common typographical conventions used to jazz up text.
Okay, so far we've talked about how to fiddle with all sorts of cosmetic aspects of tables. For all this, however, they're still essentially grids, which is sometimes inconvenient. For example, let's say that I want to group a number of columns together under a broad heading, something like this:
| Joe's Supermkt. | Bill's Shop | |||
|---|---|---|---|---|
| Cost | Size | Cost | Size | |
| Choke-a-Cola | $3.99 | 12 pk. | $3.49 | 12 pk. |
| Pesky-Cola | $3.79 | 12 pk. | $5.99 | 24 pk. |
Hey-- the first row has table heading cells which are spanning multiple columns! Although the table is still fundamentally gridlike, cells can be merged, thereby creating larger cells. Especially note how the edges of the expanded heading cells line up with the edges of cells in other rows. How did this happen? The answer: by using the colspan attribute. Here's the markup for the first two rows of the above table:
   <TR>
      <TH></TH>
      <TH colspan="2">Joe's Supermkt.</TH>
      <TH colspan="2">Bill's Shop</TH>
   </TR>
   <TR>
      <TH></TH>
      <TH>Cost</TH>
      <TH>Size</TH>
      <TH>Cost</TH>
      <TH>Size</TH>
   </TR>
A cell with <TH colspan="2"> will 'grow' to the right, consuming the next cell in the row like some sort of virtual amoeba. It's sort of like this:
The blurry, dashed lines represent where cell edges would be if it weren't for the colspan attributes.
Regular <TD> cells can also have the colspan attribute. Note, however, that the only way that rows will 'balance' (be of equal length) is for there to be fewer cell tags in a row which has a spanning cell than in a row with no spanning cells.
For example, if you take a 5-by-5 table and simply change one of the cells so that it spans three columns, that cell's row will have two cells hanging off the right side of the table.
| A1 | A2 | A3 | A4 | A5 | ||
| B1 | B2 | B3 | B4 | B5 | ||
| C1 | C2 | C3 | C4 | C5 | ||
| D1 | D2 | D3 | D4 | D5 | ||
| E1 | E2 | E3 | E4 | E5 | ||
So when I said that the colspan cell consumed the next two cells, that's only true if there isn't any markup for those cells, if you see what I mean. If you put a colspan attribute into a cell which is part of an already-defined table, like that above, the spanning cell actually pushes the rest of the cells over to the right. If you delete two cells from the row, all is harmonious. Otherwise, your table will look a bit out of kilter, as your rows will be of unequal length.
Similar to column spanning, both table headers and table data cells may span rows. It probably comes as little surprise to you that the attribute used to accomplish this task is called rowspan. Let's take the previous table and change the cell <TD colspan="3"> to <TD rowspan="3">. Therefore:
| A1 | A2 | A3 | A4 | A5 |
| B1 | B2 | B3 | B4 | B5 |
| C1 | C2 | C3 | C4 | C5 |
| D1 | D2 | D3 | D4 | D5 |
| E1 | E2 | E3 | E4 | E5 |
The cell in question now "grows" down, instead of to the right. Also, the table is now out of square, as it were. It's almost as though the third and fourth rows have six cells, although of course this isn't the case. They've simply been rearranged to accomodate the spanning cell from row two. When a cell spans rows, the spanning cell is treated as dead space in later rows and the cells in those later rows simply jump across it, as you can see.
Again, if you want the table to be 'balanced,' you'll need to delete cells in the affected rows. Neither rowspan nor colspan may be applied to the <TR> tag, only to <TH> and <TD>.
| CHAPTER 7: Frames |
Frames allow you to divide Web pages into multiple scrollable regions. Each region can reference a separate URL, allowing the display of multiple Web pages within one page. Each region, or FRAME, can be NAMEd, allowing it to be targeted. One frame can refer to another frame through its name, allowing one frame to be updated by clicking on a link in another.
Frames can be nested to create intricate FRAMESETs. You should limit the total number of frames to three or four as each one usually requires a separate page to load within it.
Frames open up new interface possibilities on the Web. You can use a non-scrolling fixed frame as a "shelf" for ad banners or button bars. Table of contents can remain fixed in one frame while the content frame is updated. Frames work well with JavaScript or VBScript, you can update multiple frames with one click, and create intricate, interactive interfaces.
A framed document has a basic structure very similar to your normal HTML document, except the FRAMESET tag replaces the BODY tag. FRAMESETs contain two or more FRAMEs which each refer to separate URLs. The FRAMESET tag has two structural attributes, ROWS, and COLS which divide the page up into multiple rows or columns. To allocate portions of the page you give the ROWS or COLS attribute a list of absolute or relative values each representing a frame. These can be in pixels (i.e., 60), a percentage (1-100%), or a relative-sized amount (*, 2*, 3*).
The * character is a "relative-sized" frame and is interpreted as a request to give the frame all remaining space. Multiple relative-sized frames get equal amounts of the remaining space. Putting an integer before the * weights that frame by that factor. "*,2*" would give 1/3 of the space to the first frame, and 2/3 to the second.
Example frameset with 3 columns, the first and last take up 20% each and the second takes up 60% of the page.
Example frameset with 3 rows, the first two a fixed height, and the remaining space allocated to the bottom frame. Note that in Netscape 3, the frame sizes still vary somewhat when resizing your window, while in Explorer 3 they don't.
Additional FRAMESET appearance attributes are:
The FRAMESPACING and BORDER attributes perform the same function in Explorer 3 and Netscape 3, they set the width of the frame borders. In practice you can combine them to work with both browsers.
Invisible Frame Borders. You can now hide frame borders in Netscape and Explorer 3. For non-nested framesets this creates a seamless look. Example:
See Cool Site of the Hour for an example.
The FRAME tag defines a single frame within a frameset. Each frame refers to a specific URL to display. That URL can be another FRAMESET page, so frames can be nested. In Netscape 3 the FRAME tag has 9 attributes 7 of which are common to Explorer. (SRC, NAME, MARGINWIDTH, MARGINHEIGHT, SCROLLING, NORESIZE, FRAMEBORDER, [BORDER, and BORDERCOLOR Netscape-specific]). The key attributes are SRC=URL (displays the document corresponding to that URL in that particular frame) and NAME. The NAME attribute assigns a window name to a frame so it can be targeted.
Example without NOFRAMES:
Unfortunately, users without a frame-enable browser users will see nothing when they load this page. To allow for older browsers, or users with FRAMEs disabled use the <NOFRAMES> tag.
Example with the NOFRAMES tag
A common practice on the Web is to use the NOFRAMEs tag to scold people to get Netscape. A better use is to offer a non-frame alternative so everyone can see your page.
Targets control what content appears in what frame. To load a page into a frame, you simply refer to it in a link. The resource referenced by the URL displays in the targeted frame. The TARGET attribute can be added to a variety of HTML tags. The syntax is:
TARGET's can appear in A, BASE, AREA, and FORM tags. The A and AREA tags work identically. You simply add the TARGET="frame_name" to the link, i.e.,
BASE Tag - Use the TARGET in the BASE tag when you want all (or most) of the links in your document to be targeted to the same window. The TARGET attribute establishes a default frame_name that all links within the document will be targeted to. The default is overridden by TARGETs in individual anchor tags. Example:
FORM Tag - Instead of viewing the results of a form submission in the same window, you can force it to appear within a frame. Example:
Frame names must begin with an alphanumeric character. This distinguishes them from special reserved TARGET names that begin with an underscore.
Avoid Nesting: To ensure that external links will jump out of your frames use <BASE TARGET="_top">. This avoids the nesting nightmares when a framed site links to another framed site. Local TARGETs override this global setting.
Netscape and Explorer default to resizable frames. This is a good idea for any frame that could have varying sized content. Fixed ad bannners or button bars have a known size and can safely use the NORESIZE and SCROLLING="NO" attributes to create a "shelf." Popups and other elements can vary in size on different platforms so give the user control to customize your framesets. For simple layouts just leave off the NORESIZE attribute. For more complex layouts where frames butt against each other you must nest FRAMESETs to allow resizing.
Newer browsers add the FRAMEBORDER, BORDERCOLOR, and BORDER attributes to the FRAME tag. The FRAMEBORDER tag sets the presence of borders in FRAMES or FRAMESETs. The BORDER attribute sets the width of all borders within a frameset, and can only be used in the FRAMESET tag. The BORDERCOLOR sets the color of the frame border.
For more info on the TABLE tag and all of its associated attributes, click here.
For a good frames tutorial, click here.
| CHAPTER 8: Forms |
Web forms let a reader return information to a Web server for some action. For example, suppose you collect names and email addresses so you can email some information to people who request it. For each person who enters his or her name and address, you need some information to be sent and the respondent's particulars added to a data base.
This processing of incoming data is usually handled by a script or program written in Perl or another language that manipulates text, files, and information. If you cannot write a program or script for your incoming information, you need to find someone who can do this for you.
The forms themselves are not hard to code. They follow the same constructs as other HTML tags. What could be difficult is the program or script that takes the information submitted in a form and processes it.
Before we get started on the subject of forms, there is something which needs to be made perfectly clear. It is simply this: I cannot teach you how to create completely functional forms. Why not? Because there is a lot more to a form than the HTML tags.
In fact, the HTML form is, at most, half the story. The other half is a program which resides on the Web server itself. This program is written in a language such as Perl, C/C++, TCL, AppleScript, or another Common Gateway Interface (CGI) language.
I will not attempt to teach you any of these labguages. Writing a tutorial for a programming language is a lot more complicated and indescribably more time-consuming than an HTML tutorial, and we're not ready for that yet. So, you'll need to either know one of these languages, learn one, or find somebody who knows one and is willing to write your programs for you. Some sites offer pre-made scripts that you can use for your site, which require little or no programming knowledge. One really good source of this type of info is Matt's Script Archive.
So anyway, the role of this CGI program is to accept the data which the user inputs and then do something with it. What does it do? That depends on what the program has been written to do. It could e-mail the data to someone, or add an entry to a database, or write out a text file, or create a customized display, or just about anything else you can think of.

A very common use for HTML forms is creating a feedback form, or other user-response form. Usually, the feedback from the user is e-mailed to somebody. So how does this work?
Actually, data is passed from the HTML form to the CGI program in name-value pairs. The value is whatever the user enters, and the name is the label used to identify that input. Confused yet? Don't be.
Here is an example. Please realize that technically, this is not the way things actually look, but it's close enough for our purposes. Let's say we have a form with three inputs: name, rank, and serial number. The inputs are labeled NAME, RANK, and SN, respectively. The user enters the data "Eric" for the name, "Very Low" for rank, and "123-45-6789" for the serial number.
The data sent to the CGI program would look something like this:
   NAME = Eric
   RANK = Very Low
     SN = 123-45-6789
The program would then do something with each piece of data. For those of you familiar with programming languages, you recognize what's going on here. The labels are variable names, and the inputted data are the values of the variables.
Let me put it another way (those of you who understood the preceding explanation can skip to the next section). Let's say each input is a labelled box. In the preceding example, the labels would be NAME, RANK, and SN. Whatever the user types in for a given box becomes the contents of that box.
The boxes are then all loaded onto a truck (i.e., your connection to the Web server) which hauls them off to the CGI program. The program then unloads the contents of each box and does something with what it finds. What it does depends on how it's been programmed. An overly simple explanation, perhaps, but conceptually accurate.
This leads us to a very important point: no two inputs can share the same name. Each input has to have its own unique identifier, so that the CGI program can figure out which piece of data belongs where. So if I use the name "ssn" to refer to a Social Security Number input, and then later ask for the name of a nuclear submarine, I must use a different name. "sub" would work, as would "boat," but "ssn" is not allowed.
What happens if you do use the same name twice? Well, no error messages will pop up and warn you about it. If you have two inputs with the same name, what will happen is that the browser will assign one or the other of the values which the user inputs to the name. The one which is not assigned will simply disappear. This may lead to odd results from your CGI program, but it isn't the program's fault. It's simply using the value it received, and it has no way of knowing that another value was input and discarded by the browser.
This is the part that is different for each different script. The entire preceding section is a fairly generic description, applying to all forms of this type. What each CGI program does is up to its author. For example, let's say we have a program which is supposed to take the name, rank, and serial number and mail the information to an e-mail address.
For the purposes of this example, assume the CGI program is running on a UNIX-based server. The first thing the program does is create a text file containing the information with appropriate labels. The file would look something like this:
   The following information was input by the user...
      Name: Eric
      Rank: Very Low
        SN: 123-45-6789
The CGI program then sends this file over to sendmail, a common UNIX mail utility, along with some subject and destination information which the CGI program has been written to provide to sendmail. The file is then mailed to its intended destination, and arrives looking something like this:
   Date: Fri, 23 Feb 1996 10:35:00 -0500 (EST)
   To: you@your.site
   From: somebody@some.where.org
   Subject: Data for user 'Eric'

   The following information was input by the user...
      Name: Eric
      Rank: Very Low
        SN: 123-45-6789
Of course, as I have said, this is but one of the literally infinite number of things which CGI programs can do. It's merely one of the most common.
You've probably been wondering how the browser knows where a form begins and ends. For that matter, how does the browser know where to send the data? Yes, of course, to the CGI program, but... where is that program located? The data has to be sent to a specific location.
This is accomplished by using the <FORM> tag. This tag has two attributes which must be used if the form is to have any prayer of working correctly. The attributes are METHOD and ACTION.
Here's what an empty form would look like:
   <FORM method="post" action="/cgi-bin/program1">

   </FORM>
METHOD has two possible values: GET and POST. If you want the data to go from the browser to the CGI program, as discussed below, then use the method POST. I'm not even sure what GET does, to be honest, but as soon as I figure it out I'll explain it (briefly) here.
The ACTION attribute contains the URL of the CGI program which processes the data sent by the browser. In the example above, the program (program1) resides in the cgi-bin directory of the server which contains the form itself. The value of ACTION can be either a relative or a full URL.
Any tag which is allowed inside of the <BODY> container is allowed inside a form. Headings, paragraphs, lists, tables, images, links-- anything and everything goes. In addition, there are certain tags which are allowed to exist inside a form, and nowhere else.
...that you've been introduced to what's going on in the background and to the basic form container, let's start learning the HTML tags which create form elements. We'll kick things off with the most pervasive tag, called INPUT, in the next chapter.
This is where we start on the real HTML markup for forms. (Remember, this is only half the story-- the other half is the CGI program.) We've already seen how the <FORM> tag works. Now we start creating ways for the user to enter actual data.
The most commonly used form tag is INPUT. This is because there are several types of INPUT, like open text inputs, radio buttons, and checkboxes. The most basic version of the tag is <INPUT>, but like <IMG>, various attributes are required to make it work. The type of input is specified using the TYPE attribute (makes sense, yes?). We'll start with text inputs.
A text input is simply a box in which anything can be typed-- letters, numbers, or anything else-- via the keyboard. In most browsers, the box is twenty characters wide, but this can vary. The markup and its effect:
Markup: <INPUT type="text" name="socsec">
I chose the name of the input for a reason. "socsec" is short for "Social Security," as in the oh-so-famous and theoretically private number. Now, a twenty-character input is a little large for a nine-digit number (ignore the dashes). Wouldn't it be nice to have an input which is nine characters wide?
Fortunately, it's quite possible. This is accomplished using the SIZE attribute. The value of SIZE is a positive integer and translates into the width of the input box. This width is expressed as a number of characters. Therefore, SIZE=9 means the input will be nine characters wide.
Markup: <INPUT type="text" name="socsec" size="9">
This causes the input box to be nine characters wide-- exactly what we needed. This does not, however, restrict the number of characters which can be input. The user can keep typing past nine characters, so this still isn't a very good way of getting a Social Security number.
Happily enough, you can limit the number of characters which may be input by using the MAXLENGTH attribute. The value of MAXLENGTH is expressed as a number of characters, just as SIZE is. So, let's continue with the Social Security input example. We not only want the box to be nine characters wide, but the maximum number of characters which can be input to also be nine. The tag and its resulting input box would be:
Markup: <INPUT type="text" name="socsec" size="9" maxlength="9">
As you can see, this creates an input field nine characters wide into which no more than nine characters may be input.
You should keep in mind that maxlength and size do not have to be equal. They can be any positive integer, and either can be larger or smaller than the other. Therefore, you could create a small input field that will take a large number of characters, or a wide field which allows only a few characters. It's completely up to you, although it is usually a good idea to keep the values at least close to each other.
Here's a further example:
Markup: <INPUT type="text" name="socsec" size="9" maxlength="11">
In this case, the Social Security input field is still nine characters wide, but the user can enter up to eleven characters. The user may now enter the dashes if he wants to, although entering the number without dashes will visually fill the input field.
There is still one more thing which would make this the ideal input for a Social Security number, and that's the ability to restrict the characters which can be input. In our example case, we would like to allow only numbers to be input by the user, since Social Security numbers are just that-- numbers.
How is this done in HTML? It isn't. Sorry. There is no way to specify that only certain characters may be input. Anything the user can type on his keyboard will go into a text input. If a given input should have only certain characters, then the back-end CGI program will have to check for them and return any error messages necessary.
One obvious drawback of the text input is its openness. Suppose you needed to ask for a password (or similarly sensitive piece of information, like the user's weight). If you use an <INPUT type="text"> tag, anyone sitting next to or behind the user will be able to read what the user types as it appears on the screen. This is what is typically referred to as Not a Good Thing.
There is a solution to this problem, in the form of a new type of input. This is the password input. Password inputs are strikingly similar to text inputs, in that they accept any input from the keyboard, they can have SIZE and MAXLENGTH attributes, and (as always) they require names. The difference is that when the user types in a password field, the computer displays bullets or asterisks instead of the characters being typed. Thus, the user's password is kept safe from the prying eyes of his roommate, spouse, boss, or whomever.
A typical password input would look like this:
Markup: <INPUT type="password" name="pwd" size="15" maxlength="15">
Be warned, however: this 'visual security' is the furthest extent of the security afforded by the password input. There is absolutely no encryption of any kind whatsoever. Information entered into a password input is still sent to the CGI program 'in the clear;' that is, as plain text. This makes it vulnerable to security attacks such as packet sniffing, which are uncommon but not unheard of.
The only way to ensure the safety of information entered into a password field is to send it over a connection to a secure Web server, in which case all of the data entered into the form-- not just the password field-- is encrypted.
Text inputs are nice for certain kinds of questions, but sometimes, as with multiple-choice questions, you want to provide a limited number of responses. Providing a listing of all the answers and expecting the user to type in one of them is obviously a bit silly. It's a good thing that there are tags to make such methods unnecessary. The next chapter will look at these INPUT types.
As was pointed out at the end of the last chapter, sometimes it is not very helpful to have an open text input. The SATs, for example, do not ask for essays, which are difficult to score and would take forever to process, but rather present a series of easily graded multiple-choice questions. Happily enough, this capability does exist in HTML forms.
This INPUT type is best used when you want the user to select one of a limited number of choices. For example, suppose you wanted to find out which computer operating system your users prefer. Of the six options provided, the user should only be able to pick one. The list will look something like this:
and act like this:
What happens, as you have seen, is that only one option can be chosen. If an option is already selected, then choosing another option will de-select the previously chosen option and select the new option. Since there is nowhere for the user to enter a value, however, the value of each option must be specified in the HTML markup itself, using the VALUE attribute.
   <P>
   Your favorite computer operating system:<BR>
   <INPUT type="radio" name="fav_os" value="mac">Macintosh<BR>
   <INPUT type="radio" name="fav_os" value="dos">DOS<BR>
   <INPUT type="radio" name="fav_os" value="win">Windows<BR>
   <INPUT type="radio" name="fav_os" value="win95">Windows95<BR>
   <INPUT type="radio" name="fav_os" value="os2">OS/2<BR>
   <INPUT type="radio" name="fav_os" value="unix">UNIX<BR>
   </P>
Again, the use of the VALUE attribute is required for radio-button inputs.
Now, the first thing that most people say upon seeing the above list is, "Oh ho, the author finally messed up! He's using the same name for every one of those INPUT tags, and I clearly remember him saying in Chapter 4 that you can't do that! Time to write e-mail!"
Before you start gleefully typing away, let me assure you that the above markup is one hundred percent correct. Furthermore, although it may seem like it right now, I have not contradicted what I said earlier. What I said was that each input needs to have a unique NAME. I did not say that each INPUT needs to have a unique NAME.
Right about now, many of you will be very intelligently saying, "What?" The difference is that the entire set of INPUT tags shown above may be considered to constitute one input. Let's call this a "logical input." A logical input may be composed of many, many INPUT tags-- theoretically, no limit exists-- but it will still return only one value, which is the value of the option selected by the user.
In fact, it is vital that each of the INPUT tags in a radio-button logical input have the same name. Otherwise, the browser has no way of knowing that the different INPUTs are all part of the same logical input. When you select a radio button, the browser checks to see if any other radio buttons with the same NAME are selected. If so, it de-selects that button for you automatically.
So, in the above example, assume I selected the first option, "Macintosh." The value of fav_os would then become mac. If I were to then change my mind and select the fifth option, then the value of fav_os would be os2. If no option is selected, then the value of fav_os would be nothing (not zero, but literally nothing).
But what if we want to let the user select more than one option at a time? Radio buttons won't allow that sort of thing. However...
The HTML markup for a checkbox logical input looks very similar to that for radio buttons. The only structural difference is the use of TYPE="checkbox" instead of "radio". For example, let's assume that not only do we want to know which OS the user prefers (see above), but we also want to know which ones they've used, so that we can draw some sort of correlation between the two. Thus:
   <P>
   What operating systems have you used?<BR>
   <INPUT type="checkbox" name="os_used" value="mac">Macintosh<BR>
   <INPUT type="checkbox" name="os_used" value="dos">DOS<BR>
   <INPUT type="checkbox" name="os_used" value="win">Windows<BR>
   <INPUT type="checkbox" name="os_used" value="win95">Windows95<BR>
   <INPUT type="checkbox" name="os_used" value="os2">OS/2<BR>
   <INPUT type="checkbox" name="os_used" value="unix">UNIX<BR>
   </P>
Once again, VALUE is required for each INPUT tag, because the user has no way to input any values himself-- merely to select from a list of options. In a checkbox logical input, the user can select some, or all, or none of the options provided. Try it yourself:
So how do multiple responses get transmitted if there's only one value allowed for a given name? Let's assume that the user checks the boxes for Macintosh, DOS, and Windows95. The value of os_used would be mac|dos|win95, where the | represents a separator (usually a null character). There is one value for the NAME defined as os_used, but it contains all of the options which the user selected. The CGI program will need to be able to take the value and split it up into its components. Fortunately, most CGI languages have libraries which were written to accept form-entered data, so this should not be a problem.
Of course, any good survey has an inherent bias, because otherwise you run the risk of having your assumptions challenged-- and you wouldn't want that, now would you? Besides the usual tricks like wording questions a certain way or putting the answers you want at the top of the list, you can present the user with pre-selected options, so that even if he doesn't touch any of the options, a given value will still be returned.
This is accomplished by using the CHECKED attribute. Simply adding this attribute to a radio or checkbox INPUT tag will cause that INPUT to be selected as soon as the page is loaded (or reloaded). For example, suppose you're going to ask a question you're pretty sure you know the answer to, but can't be completely certain.
Are you breathing at the moment?
<INPUT type="radio" name="breathing" value="Y" checked>Yes
<INPUT type="radio" name="breathing" value="N">No
Obviously, you will want to use CHECKED on only one option in a radio-button logical input, as shown above, but multiple checkboxes in a given logical input could be set as CHECKED.
In the next chapter, I'll be talking about a completely new tag; in other words, we're leaving INPUT behind for a while. This new tag, called SELECT, will introduce an entirely new way to present choices to the users.
Text inputs and buttons to select are all very nice, but they clutter up the screen and get a little boring after a while. What's an author to do? Break up the monotony of your forms with the SELECT tag! You'll be glad you did.
Let's say you want to have your readers indicate which country they live in. You could create a radio-button input listing all two-hundred-plus countries in the world, but that would obviously take up a lot of space on the screen. How can you avoid this unsightly mess?
Well, you could try using a SELECT list. This will create a pop-up list from which any one option may be selected. The advantages are that you still have a list to choose from, but it takes up very little screen space until the user interacts with the list.
Although a list of two hundred countries should probably be contained in a list such as is described below, be aware that some browsers will not be able to handle displaying lists that long. This is not due to any limitations in HTML, but instead to sloppy programming on the part of those who wrote the browsers. Test long lists extensively, in multiple browsers, before unleashing them on the general public; also realize that there are alternatives, which will be discussed later in the chapter, to pop-up lists.
I'm not actually going to use the 'countries of the world' example, because I don't feel like typing in a list that long-- besides which, several countries are in the habit of changing their names every other week, so the list would be continually out of date. Instead, I'll ask the user what kind of connection he's using to get his Internet feed. Select the line "No response" which appears right after this paragraph.
As you saw, you can change the current option by selecting the list and moving through it until you get the choice you want. How is this done? The markup:
   <P>
   How are you reaching this page?
   <SELECT name="access">
   <OPTION>No response
   <OPTION>Compuserve
   <OPTION>America On-Line
   <OPTION>Local ISP
   <OPTION>National ISP
   <OPTION>Straight Internet connection
   <OPTION>Beats me, my kids set up this thingamajig
   <OPTION>None o' yer beeswax
   <OPTION>Other
   </SELECT>
   </P>
There are a few things to mention. First, obviously, is the required presence of a NAME attribute in the SELECT tag; in this case, the NAME is access. Second, almost as obviously, is that SELECT is a container, requiring a close tag (</SELECT>). Third, the size of the list-box is as wide as the longest option in the list. Fourth, the browser will typically set the list to the first OPTION (although there are ways to change this behavior; we'll get to that in a moment). Finally, between the open and close tags of the select list are...
Each choice in the select list is defined using the OPTION tag. Note that there is no VALUE attribute throughout the list. That's because the text after the OPTION tag is taken as the value of the selection. So if I were to pick the option "Local ISP," the value of access would be Local ISP. Picking the next-to-last option would set the value to None o' yer beeswax, and so on. Thus, a VALUE= statement is not required.
This does not mean it is forbidden, however. It is still possible to explicitly assign values to some, or all, or none of the options in the list. Let's say that I wanted to set the values of the various choices to be one through eight, with zero for the "No response" choice. In that case, I would set up the following:
Markup:
   <P>
   How are you reaching this page?<BR>
   <SELECT name="access">
   <OPTION value="0">No response
   <OPTION value="1">Compuserve
   <OPTION value="2">America On-Line
   <OPTION value="3">Local ISP
   <OPTION value="4">National ISP
   <OPTION value="5">Straight Internet connection
   <OPTION value="6">Beats me, my kids set up this thingamajig
   <OPTION value="7">None o' yer beeswax
   <OPTION value="8">Other
   </SELECT>
   </P>

Result:
Selecting "National ISP" would set access to a value of 4, "Compuserve" would return a value of 1... you get the idea. There is no change in what the user sees in terms of the options presented, but the data returned to the CGI program is definitely different.
You can never use any HTML tags (other than OPTION) within the SELECT container.
Suppose that we don't want to use a "pop-up" list, but instead want a scrollable list. For example, returning to the 'countries of the world' list, I pointed out that many browsers can't display a pop-up list that long. Instead, we want to use a list where we can't see the whole thing at once, but we can still scroll through it, and are able to see a portion of it at any time.
This is accomplished using the SIZE attribute in the SELECT tag. The number specified by SIZE sets the number of lines of text which are displayed at once. I'll go with a list of the fifty United States of America, mostly because it's a shorter and much more stable list than the list of countries. The following example shows the beginning and end of the list, and what the list looks like:
Markup:<SELECT name="state" size="10"> [ insert name of the 50 states... ]</SELECT> Result:
In this case, the browser has been told to show 10 lines, so we see twenty percent of the total list at any time (10 out of 50). SIZE can be set to any positive integer, although going past twenty is generally discouraged.
As you have no doubt figured out by now, a SELECT list is functionally equivalent to a radio-button input. The user can only select one choice, and selecting a new choice de-selects the old choice. There is also a type of list which is equivalent to a checkbox input, but it doesn't use a new tag. Instead, it's a variant on SELECT.
In order to create a list in which multiple selections can be made, simply add the MULTIPLE attribute to the SELECT tag. This will let the user select more than one choice, and in some browsers they'll be able to do range-selections, and so on.
We'll use the list of fifty states again, but this time we'll ask the user to indicate which ones he has visited.
Markup:<SELECT multiple name="state" size="10"> [ insert name of the 50 states... ]</SELECT> Result:
If you're using a graphical browser, try scrolling around in the list and shift-clicking on different options. Then try control-clicking. Try clicking on already-selected options, using one or the other of the modifier keys. Just like checkboxes, you can select or de-select options at will.
This is all well and good, but isn't there a way to specify a default choice? Yes. Returning to the first example list, the one about access methods, let's assume that I want to make the default choice to be the last option, "Other." However, I don't want to move it to the top of the list for some reason. In that case, I would simply use the attribute SELECTED. Thus:
Markup:
   How are you reaching this page?
   <SELECT name="access">
   <OPTION>No response
   <OPTION>Compuserve
   <OPTION>America On-Line
   <OPTION>Local ISP
   <OPTION>National ISP
   <OPTION>Straight Internet connection
   <OPTION>Beats me, my kids set up this thingamajig
   <OPTION>None o' yer beeswax
   <OPTION selected>Other
   </SELECT>

Result:
Obviously, only one SELECTED should be used in a normal SELECT list, whereas you could use SELECTED on many different options in a SELECT MULTIPLE list.
Take a breather, we're almost there. Just a few more tags, and we'll be done with forms markup. I promise.
The TEXTAREA tag is used to create a box where the user may type large amounts of text at will. A typical use for TEXTAREA is to ask users to input general comments they may have about a Web site. In addition to having some special attributes, TEXTAREA is a container, so the close-tag is required.
<TEXTAREA name="comments" rows="5" cols="65"></TEXTAREA>
The special attributes I referred to are, as you might have guessed from the above example, ROWS and COLS. These specify the number of rows high and columns wide the textarea should be. The numbers are measured in characters, so ROWS=5 makes the box five lines high, and COLS=65 means that the box will be 65 characters wide. This will cause the box to grow or shrink depending on the size of the monospace font set by each user.
To make the example a bit more real:
Markup:
   <TEXTAREA name="comments" rows="5" cols="65"></TEXTAREA>
Result:
As you see, the input is not limited to the number of rows and columns specified in the tag; a line can be longer than the width of the box, and there can be more lines than the height of the box. The user is basically given an interactive area of preformatted text to play with-- all of the rules of the <PRE> tag apply within.
While TEXTAREA boxes do not have the ability to do dynamic word-wrapping yet, they may soon. The ability to add attributes such as "textwrap" to the TEXTAREA tag has been discussed, and may be widely supported by the time you read this.
You may wonder why textareas are containers. After all, the close tag doesn't seem to serve much purpose. Actually, it does. If you want to insert some text into the textarea as a default, it would go between the open and close tags.
Markup:
   <TEXTAREA name="comments" rows="5" cols="65">Please type here...</TEXTAREA>
Result:
Again, preformatted-text rules apply within the textarea. If you put a return between the open tag and the enclosed text, then the text will appear on the second line of the textarea.
That's right, our old friend INPUT is back. In fact, the last three form elements we'll discuss are types of the INPUT tag. After that, I'll mention one last wrinkle in text inputs, and that's it!
The first type is hidden. It does exactly what it sounds like: it allows for an input which is hidden from the user.
The natural assumption is that this is one of those computer geek in-jokes, so that we can secretly create places to type in data which can't be seen but are nonetheless there. This is not actually the case. Hidden inputs are completely hidden from the user-- there is no way to affect the value of the INPUT, which is why assigning an explicit value is important. Otherwise, the value of the input will be literally nothing. Take a look:
Markup:
   <INPUT type="hidden" name="sendTo" value="dan@iamdanaustin.com">

Result:
Yes, the Result section does contain markup. Trust me, it's there. It's just hidden. (Go figure.)
The next question which usually gets asked is, "What's the point? What's it good for?" Well, what it's good for is to pass information to the CGI program which does not and should not change, but is for some reason important.
A good example of this is the Aurora Generic Feedback System, which was written by Library Information Technologies in an attempt to provide our users with basic feedback forms without the need for teaching them a CGI language, or writing a new script for every form. There are four interactive inputs allowed, and a fifth hidden input called "sendTo," which should look a bit familiar. The value of "sendTo" is the e-mail address of the person who should receive the feedback which users enter into the form.
This way, using one program, we can support a theoretically infinite number of feedback forms. An author has only to set up the form, plug his e-mail address into the VALUE attribute of the "sendTo" INPUT, and he's done.There are other uses for hidden, but most (if not all) of them fall into categories similar to what I have just described.
Granted, all of these form elements are really cool, letting the user input data in a variety of ways, but what good are they if the user can't tell the browser when to send the data off to the CGI program? And what if the user realizes he made several mistakes and just wants to start over instead of correcting each one of the mistakes he made?
That's what the INPUT types "submit" and "reset" are for. Atypically, these INPUTs do not need names, as they do not generate any data to be sent. Their functions are to affect the rest of the form.
First, submit inputs are the user's way of saying, "I'm done now, take this stuff I input and do that voodoo that you do so well!" The markup...
<INPUT type="submit">
...will create a button on the screen which says something like "Submit Query" (the actual label may vary). Selecting a Submit button triggers the posting of the input data to the CGI program.
Similarly, the markup...
<INPUT type="reset">
...places a button which is labelled something like "Reset Form" (again, the actual label will vary). Selecting the button will cause the entire form to be reset to its default state, wiping out any and all changes made by the user.
Usually, the two buttons are placed together at the bottom of a form, as in Figure 8.1, but there is nothing which says they have to go together, or at the bottom of the form. That's a matter of custom more than anything else. You could put them at the top of the form, or in the middle, or separate them by entire paragraphs, or have multiple Submit and Reset buttons sprinkled throughout the form.
Most people feel that the default labels which browsers give to these buttons are pretty boring. Fortunately, you can change those labels by using a VALUE attribute. For example:
   <INPUT type="submit" value="Send This Puppy">
   <INPUT type="reset" value="No, Wait, It's All Wrong">
will yield the following:
The functions of the buttons are, of course, still the same.
There is another way you can use the VALUE attribute with an INPUT tag. If you assign a value to a text or password input, then it will appear in the input box by default.
The user is perfectly free to add to, alter, or completely replace the contents of the input box if he feels like doing so, of course. If he does nothing to the contents of the input, then its predefined value will be used when the form is submitted.
Here is an example of how to execute hyperlinks via a form, including the creation of a "Go" box:
Try it out!
| CHAPTER 9: Image Mapping |
One topic I didn't tackle in my previous tutorials was that of image mapping; that is, allowing the user to click on an image and then have the browser go to different pages depending on where the user had clicked on the image. This is often used for button panels and toolbars, such as those at the top and bottom of the pages of this tutorial.
I avoided this topic for a variety of reasons, but the main one was that back then, image mapping could only be done with the help of a server-side program. This made things somewhat complicated-- and making it worse, there were a number of mapping programs, each with its own file format. Rather than take on the entire tangled mess and add a chapter or two to either of the previous tutorials, I decided to wait until the time was right.
Well, that time is now-- because you can map images without the need for a server-side program. That's right. Client-side image mapping is here! You can define image maps within your HTML documents, with no more messing about with server-side applications and configuration files.
In order to map an image, you'll need to use a new attribute to the IMG tag: usemap. The value of usemap is the name of a map definition (which we'll get to in the next section). For example, assume that you have a map named "homepagemap" which is imbedded in your home page, and you want to apply it to your home page's main image (mainpage.gif). The markup would look something like:
<img src="mainpage.gif" usemap="#homepagemap">
I realize that this seems a bit confusing at the moment, but keep going. If necessary, you can refer back to this point after you've finished the chapter.
So how does it work? Well, the basic structure of an image map is the container (<MAP>...</MAP>). The MAP tag has but one attribute: name. You use this attribute to give a name to your map definition, oddly enough. The name can be just about anything you want, from "homepagemap" to "map2" to "grover."
   <MAP name="map2">
   .....
   </MAP>
The MAP container needs something to go inside it, of course. After all, what good is it to name a map if it doesn't have any regions defined?
Active regions-- that is, parts of an image which the user can click on and expect something to happen-- are defined using the AREA tag. The AREA tag is empty, so no close tag is permitted.
AREA has five possible attributes: shape, coords, href, nohref, and alt. I'll take each in turn, although I expect you've figured out some of them already.
shape is used to specify what kind of geometric shape a region is to be. There are three possibilities: rect, used to define a rectangle; circle, which should be obvious; and poly, which permits an arbitrary polygon. The number of points in this polygon are theoretically infinite, although I wouldn't push your luck: try to keep the number of points under thirty.
In all these cases, the actual placement and size of the shape is determined by the coords attribute. The basic values for coords are x and y, where x and y are usually numbers measured in pixels from the top left corner of the graphic. However, if the numbers for x or y are followed by a percent sign, then they should be interpreted as percentages of the graphic's height and width. These can be mixed, so that pixel measurements and percentages of the image's size can be used in the same coords statement.
Not all browsers will interpret the percentages correctly, so make sure you test this in as many browsers as possible before using it on a Web page. In those browsers which don't support percentages, the numbers are usually interpreted as pixel measurements, so coords="50%,25%,25%" would be treated as coords=50,25,25.
The actual value of coords is totally dependent on the shape in question. Here is a summary, to be followed by detailed examples:
Here are some example AREAs and their corresponding coords:
   <AREA shape="rect" coords="10,5,20,25">
   <AREA shape="poly" coords="25,5,45,25,25,65,5,25">
   <AREA shape="circle" coords="25,25,20">


Well, now that we've figured out how to define regions, it's about time we did something about making them useful. It's pretty easy, really-- all you need to do is define a destination for each AREA tag. This is done using the href attribute, and the value of href is a URL; for example, href="http://www.mysite.org/".
Now that we have the pieces in place for a complete AREA tag, let's put them together. Let's say I want a square which starts at the upper left corner of the image, is ten pixels on a side, and points to the URL page17.html. The necessary AREA tag would be:
<AREA shape="rect" coords="0,0,10,10" href="page17.html">
The same rules about using URLs in anchors are in force using the AREA tag. You can use absolute or relative URLs, as well as references to named anchors within documents.
So what's nohref for? As you might suspect, it's used to indicate that a region doesn't do anything when clicked upon-- let's call them "inactive regions." This sounds like yet another useless concept, but it isn't. In the first place, you can use this to define regions which will be assigned targets later; in effect, placeholders for the author.
The more interesting use is that you can "cut out" sections of active regions. Assume that you want to create a clickable ring, where the center of the ring (the hole in the middle) is inactive. You could do this as a really complicated polygon, but a much easier way is something like this:
   <AREA shape="circle" coords="50,50,20" nohref>
   <AREA shape="circle" coords="50,50,40" href="page4.html">
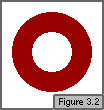 The reddish area in Figure 3.2 represents the active region of the image, based on the AREA statements above. Gray represents "dead" space, so nothing will happen if the user clicks there.
This leaves only the question: Why was the inactive region first, instead of second? The HTML specification is quite clear that in cases of overlapping regions, the first AREA tag in the map definition takes precedence over later tags.
This precedence is true in all cases, so in the following circumstance:
   <AREA shape="rect" coords="0,0,30,30" href="page1.html">
   <AREA shape="rect" coords="20,20,50,50" href="page2.html">
 ...the overlap between 20,20 and 30,30 will be mapped to page1.html, not page2.html. The dark blue area in Figure 3.3 is the first AREA statement above; the green, the second. Note the way in which the blue region "overlaps" the green.
The final advantage to client-side image mapping is that it allows for much better text-based browser support. Since the hrefs of the various regions are defined in the document, a text-only browser like Lynx can create a list of hyperlinks in the place of the image, which it obviously can't display. To account for this potential capability, the AREA tag has alt as an attribute.
The alt attribute is used in AREA tags exactly as it is with the IMG tag. You can define a text label for the region defined in an AREA tag just as you can provide text labels for the image referred to in an IMG tag.
   <AREA shape="rect" coords="0,0,30,30" href="home.html" alt="Home Page">
   <AREA shape="rect" coords="31,0,60,30" href="help.html" alt="Help!">
The HTML 3.2 specification has this to say about using the alt attribute with AREA tags:
Authors are strongly recommended to provide meaningful ALT attributes to support interoperability with speech-based or text-only browsers.
| CHAPTER 10: Behind the scenes HTML |
This tag goes into the HEAD element of an HTML document, right next to the title tags. The actual tag is BASE, and its single attribute is HREF. The value of HREF should be the URL of the document which contains the BASE tag. For example, the markup for this chapter starts out:
   <HTML>
   <HEAD>
   <TITLE>Chapter 3: Even More Header Elements</TITLE>
   <BASE HREF="http://www.cwru.edu/help/interHTML/ch3.html">
   </HEAD>
The Web browser uses the value of HREF= (that is, the URL which is specified using that attribute) to resolve any partial URLs within the document itself. Therefore, the anchor <A HREF="examples/ch3ex1.html"> would be translated by the browser into http://www.cwru.edu/help/interHTML/examples/ch3ex1.html. The browser does this by discarding the ch3.html from the BASE HREF and adding examples/ch3ex1.html to what's left.
Use of the BASE tag is not required. If a document does not contain a BASE tag, the URL used to access the document is used instead.
So why use it at all? BASE HREF can be very useful if you are mirroring a page which is part of a larger set of pages, because it keeps relative (partial) URLs from breaking. If you were to copy a document to your hard drive, for example, and then load it into a Web browser, all partial URLs within the document would refer to (non-existent) files on your hard drive. Image references might also be invalid. If the copied document contains a BASE HREF, however, then partial URLs will be resolved as full URLs for the server from which the page came.
In other words, by using the BASE HREF tag, you can fool the Web browser into thinking that the page it just loaded came from someplace other than from where it was actually retrieved.
As I said, this tag's use is strictly optional, and in most cases not at all necessary. I personally use it rarely, if at all.
Okay, suppose that you want to imbed information about your document which doesn't fit into any of the defined HTML tags. For example, let's say that you want to "sign" your Web pages. There isn't any such thing as an AUTHOR tag, so that's out. You could put your name in the text of the page itself, but suppose that for some reason that doesn't really appeal to you. (Assume that you're modest-- I know, it will be a stretch for some of you. It certainly was for me.)
There is a way, of course, to do this; otherwise, I probably wouldn't have brought it up in the first place. Using the <META> tag, you can include information which would ordinarily have nowhere to go.
<META> is an empty tag, so there is no </META> required (or available, for that matter). <META> has three possible attributes: NAME, and CONTENT, HTTP-EQUIV.
We'll stick with the author-name example for the moment. If I were to add such a tag to this page, the HTML at the top would look like this:
   <HTML>
   <HEAD>
   <TITLE>Chapter 3: Even More Header Elements</TITLE>
   <BASE HREF="http://www.cwru.edu/help/interHTML/ch3.html">
   <META NAME="Author" CONTENT="Eric A. Meyer">
   </HEAD>
Authors are not limited to one META tag per file. There is absolutely nothing wrong with adding multiple META tags, and it may be a good idea to do so in some cases. For example:
   <HTML>
   <HEAD>
   <TITLE>Chapter 3: Even More Header Elements</TITLE>
   <BASE HREF="http://www.cwru.edu/help/interHTML/ch3.html">
   <META NAME="Author" CONTENT="Eric A. Meyer">
   <META NAME="Keywords" CONTENT="HTML,tutorial,headers,base,href,meta">
   <META NAME="Expires" CONTENT="31 December 1996">
   </HEAD>
The three tags define the author's name, a number of keywords which could be used by a search engine, and the document's expiration date; that is, the date on which the document is defined to become obsolete. ("HTML-- now with Freshness Dating!")
There is no theoretical limit to the number of META tags which can be added to the file. However, there are certain types of information which should not be represented in META tags.
The thing to avoid the most is the use of META tags to represent information which should be contained in pre-defined tags. For example, the document's title should not be placed into a META tag, because that information belongs in the TITLE container. Therefore, the tag...
<META NAME="Title" CONTENT="Chapter 3: Even More Header Elements">
...would be illegal. So, too, would be a META tag containing the document's base HREF, since that should go into the BASE HREF tag.
Note that use of the META tag only makes sense under limited circumstances. Nearly every browser in existence will cheerfully ignore META tags, and servers will do something with them only if specifically instructed to do so. Therefore, unless you have clear evidence to the contrary, you can assume that you don't need to include META tags in your documents.
When you put a document on a Web server, be sure to check the formatting and each link (including named anchors). Ideally you will have someone else read through and comment on your file(s) before you consider a document finished.
You can run your coded files through one of several on-line HTML validation service that will tell you if your code conforms to accepted HTML. If you are not sure your coding conforms to HTML specifications, this can be a useful teaching tool. Fortunately the service lets you select the level of conformance you want for your files (i.e., strict, level 2, level 3). If you want to use some codes that are not officially part of the HTML specifications, this latitude is helpful.
When an <IMG SRC> tag points to an image that does not exist, a dummy image is substituted by your browser software. When this happens during your final review of your files, make sure that the referenced image does in fact exist, that the hyperlink has the correct information in the URL, and that the file permission is set appropriately (world-readable). Then check online again!
If the contents of a file are static (such as a biography of George Washington), no updating is probably needed. But for documents that are time sensitive or covering a field that changes frequently, remember to update your documents!
Updating is particularly important when the file contains information such as a weekly schedule or a deadline for a program funding announcement. Remove out-of-date files or note why something that appears dated is still on a server (e.g., the program requirements will remain the same for the next cycle so the file is still available as an interim reference).
Web browsers display HTML elements differently. Remember that not all codes used in HTML files are interpreted by all browsers. Any code a browser does not understand is usually ignored though.
You could spend a lot of time making your file "look perfect" using your current browser. If you check that file using another browser, it will likely display (a little or a lot) differently. Hence these words of advice: code your files using correct HTML. Leave the interpreting to the browsers and hope for the best.
You might want to include comments in your HTML files. Comments in HTML are like comments in a computer program--the text you enter is not used by the browser in any formatting and is not directly viewable by the reader just as computer program comments are not used and are not viewable. The comments are accessible if a reader views the source file, however.
Comments such as the name of the person updating a file, the software and version used in creating a file, or the date that a minor edit was made are the norm.
To include a comment, enter:
<!-- your comments here -->
You must include the exclamation mark and the hyphens as shown.
| CHAPTER 11: Cascading Style Sheets (CSS) |
In many ways, the Cascading Style Sheets (CSS) specification represents a unique development in the history of the World Wide Web. In its inherent ability to allow richly styled structural documents, CSS is both a step forward and a step backward--but it's a good step backward, and a needed one. To see what is meant by this, it is first necessary to understand how the Web got to the point of desperately needing something like CSS, and how CSS makes the web a better place for both page authors and web surfers.
Back in the dimly remembered early years of the Web (1990-1993), HTML was a fairly lean little language. It was almost entirely composed of structural elements that were useful for describing things like paragraphs, hyperlinks, lists, and headings. It had nothing even remotely approaching tables, frames, or the complex markup we assume is a necessary part of creating web pages. The general idea was that HTML would be a structural markup language, used to describe the various parts of a document. There was very little said about how these parts should be displayed. The language wasn't concerned with appearance. It was just a clean little markup scheme.
Then came Mosaic.
Suddenly, the power of the World Wide Web was obvious to almost anyone who spent more than ten minutes playing with it. Jumping from one document to another was no harder than pointing the mouse cursor at a specially colored bit of text, or even an image, and clicking the mouse button. Even better, text and images could be displayed together, and all you needed to create a page was a plain text editor. It was free, it was open, and it was cool.
Web sites began to spring up everywhere. There were personal journals, university sites, corporate sites, and more. As number of sites increased, so did the demand for new HTML tags that would allow one effect or another. Authors started demanding that they be able to make text boldfaced, or italicized.
At the time, HTML wasn't equipped to handle these sorts of desires. You could declare a bit of text to be emphasized, but that wasn't necessarily the same as being italicized--it could be boldfaced instead, or even normal text with a different color, depending on the user's browser and their preferences. There was nothing to ensure that what the author created was what the reader would see.
As a result of these pressures, markup elements like <B> and <I> started to creep into the language. Suddenly, a structural language started to become presentational.
Years later, we have inherited the flaws inherent in this process. Large parts of HTML 3.2 and HTML 4.0, for example, are devoted to presentational considerations. The ability to color and size text through the FONT element, to apply background colors and images to documents and tables, to space and pad the contents of table cells, and to make text blink on and off are all the legacy of the original cries for "more control!"
If you want to know why this is a bad thing, all it takes is a quick glance at any corporate web site's page markup. The sheer amount of markup in comparison to actual useful information is astonishing. Even worse, for most sites, the markup is almost entirely made up of tables and FONT tags, none of which conveys any real semantic meaning to what's being presented. From a structural standpoint, these pages are little better than random strings of letters.
For example, let's assume that for page titles, an author is using FONT tags instead of heading tags like H1, like this:
<FONT SIZE="+3" FACE="Helvetica" COLOR="red">Page Title</FONT>Structurally speaking, the FONT tag
has no meaning. This makes the document far less useful. What good is a FONT tag to a speech-synthesis browser, for example? If
an author uses heading tags instead of FONT tags,
the speaking browser can use a certain speaking style to read the text. With
the FONT tag, the browser has no way to know that
the text is any different from other text.
Why do authors run roughshod over structure and meaning like this? Because they want readers to see the page as they designed it. To use structural HTML markup is to give up a lot of control over a page's appearance, and it certainly doesn't allow for the kind of densely packed page designs that have become so popular over the years.
So what's wrong with this? Consider the following:
FONT tags, just to get a sidebar with white hyperlinks in it? How many line-break tags have you inserted trying to get exactly the right separation between a title and the following text? By using structural markup, you can clean up your code and make it easier to find what you're looking for.Granted, a fully structured document is a little plain. Due to that one single fact, a hundred arguments in favor of structural markup wouldn't sway a marketing department away from the kind of HTML so prevalent at the end of the twentieth century. What was needed was a way to combine structural markup with attractive page presentation.
This concept is nothing new. There have been many style sheet technologies proposed and created over the last few decades. These were intended for use in various industries and in conjunction with a variety of structural markup languages. The concept had been tested, used, and generally found to be a benefit to any environment where structure had to be presented. However, no style sheet solution was immediately available for use with HTML. Something had to be done to correct this problem.
Of course, the problem of polluting HTML with presentational markup was not lost on the World Wide Web Consortium (W3C). It was recognized early on that this situation couldn't continue forever, and that a good solution was needed quickly. In 1995, they started publicizing a work-in-progress called CSS. By 1996, it had become a full Recommendation, with the same weight as HTML itself.
So what does CSS offer us? As of this writing, it offers us two levels of itself. The first level is Cascading Style Sheets, Level 1 (CSS1), which was made a full W3C Recommendation in 1996. Soon thereafter, the W3C's Cascading Style Sheets and Formatting Properties (CSS&FP) Working Group got to work on a more advanced specification, and in 1998 their work paid off when Cascading Style Sheets, Level 2 (CSS2) was made a full Recommendation. CSS2 builds on CSS1 by extending the earlier work without making major changes to it.
The future is likely to see further advances in CSS, but until then, let's go over what we already have.
If the depth of CSS doesn't convince you, then perhaps this will: style sheets can drastically reduce a web author's workload.
Style sheets can do this by centralizing the commands for certain visual effects in one handy place, instead of scattering them throughout the document. As an example, let's say you want all of the headings in a document to be purple. (No, I don't know why you would want this, but assume with me.) Using HTML, the way to do this would be to put a FONT tag in every heading tag, like so:
<H2><FONT COLOR="purple">This is purple!</FONT></H2>This has to be done for every heading of level two. If you have forty headings in your document, you have to insert forty FONT tags throughout, one for each heading! That's a lot of work for one little effect.
But let's assume that you've gone ahead and put in all those FONT tags. You're done, you're happy--and then you decide (or your boss decides for you) that headings should really be dark green, not purple. Now you have to go back and fix every single one of those FONT tags. Sure, you might be able to find-and-replace, as long as headings are the only purple text in your document. If you've put other purple FONT tags in your document, then you can't find-and-replace, because you'd affect them too.
It would be much better to have a single rule instead:
H2 {color: purple;}Not only is this faster to type, but it's easier to change. If you do switch from purple to dark green, all you have to change is that one rule.
Let's go back to the highly styled H1 element from the previous section:
H1 {color: maroon; font: italic 1em Times, serif; text-decoration: underline;background: yellow;}
This may look like it's worse to write than using HTML, but consider a case where you have a page with about a dozen H2 elements that should look the same as the H1. How much markup will be required for those 12 H2 elements? A lot. On the other hand, with CSS, all you need to do is this:
H1, H2 {color: maroon; font: italic 1em Times, serif; text-decoration: underline;background: yellow;}
Now the styles apply to both H1 and H2 elements, with just three extra keystrokes.
If you want to change the way H1 and H2 elements look, the advantages of CSS become even more striking. Consider how long it would take to change the HTML markup for all H1 and 12 H2 elements, compared to changing the previous styles to this:
H1, H2 {color: navy; font: bold 1em Helvetica, sans-serif;text-decoration: underline overline; background: silver;}
If the two approaches were timed on a stopwatch, I'm betting the CSS-savvy author would handily beat the HTML jockey.
In addition, most CSS rules are collected into one location in the document. It is possible to scatter them throughout the document by associated styles to individual elements, but it's usually far more efficient to place all of your styles into a single style sheet. This lets you create (or change) the appearance of an entire document in one place.
But wait--there's more! Not only can you centralize all of the style information for a page in one place, but you can also create a style sheet that can then be applied to multiple pages--as many as you like. This is done by a process in which a style sheet is saved to its own document, and then imported by any page for use with that document. Using this capability, you can quickly create a consistent look for an entire web site. All you have to do is link the single style sheet to all of the documents on your web site. Then, if you ever want to change the look of your site's pages, you need only edit a single file and the change will be propagated throughout the entire server--automatically!
Consider a site where all of the headings are gray on a white background. They get this color from a style sheet that says:
H1, H2, H3, H4, H5, H6 {color: gray; background: white;}Now, let's say this site has 700 pages, each one of which uses the style sheet that says headings should be gray. At some point, it's decided that headings should be white on a gray background. So the site's webmaster edits the style sheet to say:
H1, H2, H3, H4, H5, H6 {color: white; background: gray;}Then he saves the style sheet to disk, and the change is made. That sure beats having to edit 700 pages to enclose every heading in a table and a FONT tag, doesn't it?
And that's not all! CSS also makes provisions for conflicting rules; these provisions are collectively referred to as the cascade. For instance, take the previous scenario in which you're importing a single style sheet into a whole bunch of web pages. Now inject a set of pages that share many of the same styles, but also have specialized rules that apply only to them. You can create another style sheet that is imported into those pages, in addition to the already existing style sheet, or you can just place the special styles into the pages that need them.
For example, you might have one page out of the 700 where headings should be yellow on dark blue instead of white on gray. In that single document, then, you could insert this rule:
H1, H2, H3, H4, H5, H6 {color: yellow; background: blue;}Thanks to the cascade, this rule will override the imported rule for white-on-gray headings. By understanding the cascade rules and using them to your advantage, you can create highly sophisticated sheets that come together to give your pages a professional yet easily changed look.
This ability is not confined to just the author. Web surfers (or readers) can, in some browsers, create their own style sheets (called reader style sheets, oddly enough) that will cascade with the author's styles as well as the styles used by the browser. Thus, a reader who is color-blind could create a style that makes hyperlinks stand out:
A:link {color: white; background: black;}A reader style sheet could contain almost anything: a directive to make text large enough to read, if the user has impaired vision; rules to remove images for faster reading and browsing; even styles to place the user's favorite picture in the background of every document. (This isn't recommended, of course, but it is possible.) This lets readers customize their web experience without having to turn off all of the author's styles.
Between importing, cascading, and its variety of effects, CSS becomes a wonderful tool for any author or reader.
Besides the visual power of CSS and its ability to empower both author and reader, there is something else about it that your readers will like. It can help keep document sizes as small as possible, thereby speeding download times. How? As we've mentioned, a lot of pages have used tables and FONT tags to achieve nifty visual effects. Unfortunately, both of these methods create a lot of HTML markup, and that drives up file sizes. By grouping visual style information into central areas and representing those rules using a fairly compact syntax, you can remove the FONT tags and other bits of the usual tag soup. Thus, CSS can keep your load times low and your reader satisfaction high.
HTML, as I previously pointed out, is a structural language, while CSS is its complement: a stylistic language. Recognizing this, the World Wide Web Consortium (W3C), the body that debates and approves standards for the Web, is beginning to remove stylistic tags from HTML. The reasoning for this move is that style sheets can be used to create the effects that certain HTML tags provide, so who needs them?
As of this writing, the HTML 4.0 specification has a number of tags that are deprecated; that is, they are in the process of being phased out of the language altogether. Eventually, they will be marked as obsolete, which means that browsers will be neither required nor encouraged to support them. Among the deprecated tags are <FONT>, <BASEFONT>, <U>, <STRIKE>, <S>, and <CENTER>. With the advent of style sheets, none of these HTML tags are necessary.
As if that weren't enough, there is the very strong possibility that HTML will be gradually replaced by the Extensible Markup Language (XML). XML is much more complicated than HTML, but it is also far more powerful and flexible. Despite this, XML does not, of itself, provide any way to declare style tags such as <I> or <CENTER>. Instead, it is quite probable that XML documents will rely on style sheets to determine the appearance of documents. While the style sheets used with XML may not be CSS, they will probably be whatever follows CSS and very closely resembles it. Therefore, learning CSS now will give authors a big advantage when the time comes to make the jump to an XML-based Web.
There are a few areas that CSS1 does not address, and therefore are not covered in detail in this book; some of these topics are touched upon in Chapter 10, CSS2: A Look Ahead. Of course, even a full-blown CSS implementation, covering all of CSS1 and CSS2, would not meet every request from every page designer in the world. It's worth going through some of the boundaries of CSS.
When you get right down to it, CSS1 is not an overly complicated specification. The entire thing can be printed out in less than 100 pages, and it contains about 70 properties. It is still a very sophisticated and subtle engine, but some areas of web design were omitted from CSS1.
In the first place, CSS1 had almost nothing to say about tables. You might think that you can set margins on table cells, for example--and a web browser might even let you do so--but margins should not be applied to table cells under any circumstances. CSS2 introduced a new set of properties and behaviors for dealing with tables, but as of this writing, few if any of these are supported.
TIP:
To a certain degree, the omission of tables from CSS1 says a great deal about the feeling many have that tables should never be used to lay out pages. It is felt that floated and positioned elements should do all of the work tables used to do, and more. Whether this premise can be supported is not a discussion I intend to undertake here.
In a similar way, CSS1 contains nothing in the way of positioning. Sure, it's possible to move elements around a little bit, but mostly with negative margins and floating. Everything is, in a sense, relative. CSS2, on the other hand, has three chapters devoted to the visual rendering model, which includes the positioning of elements.
CSS1 makes no provision for downloadable fonts. This leads to a good deal of discussion about how to account for user system configurations and available fonts. CSS2 introduces some font-handling, but even there the issue is not resolved, mostly due to the lack of a widely supported font format. It may be that Scalable Vector Graphics (SVG) will solve some or all of this problem, but it is impossible at this point to say with any certainty.
Finally, there is a lack of media types in CSS1. In other words, CSS1 is primarily a screen-device language, intended to be used to put content onto a computer monitor. There is some thought toward paged media, like printouts, but not much. (Despite this, CSS1 is not a pixel-perfect control mechanism.) In an effort to overcome this limitation, CSS2 introduces media types, which makes it possible to create separate style sheets that are applied to a document depending on its display media. CSS2 also introduces properties and behavior specifically aimed at paged media and aural media.
Sadly, the major drawback to using CSS is that it was so poorly implemented at first. Through a combination of miscommunication, misinterpretation, confusion, and poor quality control, the first browsers to attempt support of CSS did a rather poor job of it.
The worst offenders are Microsoft Internet Explorer 3.x and Netscape Navigator 4.x. The first in their respective lines to attempt CSS support, these browsers have incomplete, bug-ridden, and quite often contradictory implementations of CSS1, never mind CSS2. These implementations are so bad that it is difficult to consider them CSS-supporting at all. Some of their flaws are bad enough to cause the browser to crash, or even lock up an entire system, when trying to handle some styles.
With Internet Explorer 4.x and 5.x, things did improve. Although not perfect by any means, these browser versions did at least stomp out many of the bugs that plagued IE3, and also added some support for previously unrecognized CSS properties in both CSS1 and CSS2.
Opera 3.5, on the other hand, came out of the gate with impressive CSS support. Confining itself to CSS1, this browser did quite well with the properties that it supported, suffering only a few minor bugs. When 3.6 was released, almost all of these bugs were eliminated, although support did not move past CSS1. Before version 3.5, Opera did not support CSS at all.
As for Netscape's products, the Navigator 4.7 is not significantly better at CSS support than was version 4.0, although it's at least less crash-prone. The only real hope for good CSS support out of Netscape is their Gecko rendering engine. As this was being written, the latest builds of Gecko were quite excellent, and were in fact used (along with Internet Explorer 4.5 and 5.0 for Macintosh) to create many of the figures in this book.
Since CSS is not intended to provide total control over document display, and should allow the page's content to come through no matter what browser is being used, this general state of affairs should not be considered a barrier to the use of CSS. You may wish, however, to warn your users that if they are using browsers of a certain vintage (Explorer 3.x, and perhaps Navigator 4.x) that they go into their preferences and disable style sheets. That way, they'll at least be able to read the content of your pages, even if it isn't styled the way you might have hoped.
We keep visiting the point that HTML documents have an inherent structure. In fact, that's part of the problem with the Web today: too many of us forget that documents are supposed to have an internal structure, which is altogether different than a visual structure. In our rush to create the coolest-looking pages on the Web, we've bent, warped, and generally ignored the idea that pages should contain information that has some structural meaning.
However, that structure is an inherent part of the relationship between HTML and CSS; without the structure, there couldn't be a relationship at all. In order to understand it better, let's look at an example HTML document and break it down by pieces. Here's the markup, shown in Figure 1-1:
<HTML><HEAD><TITLE>Eric's World of Waffles</TITLE><LINK REL="stylesheet" TYPE="text/css" HREF="sheet1.css" TITLE="Default"><STYLE TYPE="text/css">@import url(sheet2.css);H1 {color: maroon;}BODY {background: yellow;}/* These are my styles! Yay! */</STYLE></HEAD><BODY><H1>Waffles!</H1><P STYLE="color: gray;">The most wonderful of all breakfast foods is the waffle-- a ridged and cratered slab of home-cooked, fluffy goodness...</P></BODY></HTML>
|
|
Now, let's examine each portion of the document.
<LINK REL="stylesheet" TYPE="text/css" HREF="sheet1.css" TITLE="Default">
First we consider the use of the
LINK tag. The LINK tag
is a little-regarded but nonetheless perfectly valid tag that has been hanging
around the HTML specification for years, just waiting to be put to good use.
Its basic purpose is to allow HTML authors to associate other documents with
the document containing the LINK tag. CSS1 uses it
to link style sheets to the HTML document; in Figure
1-2, a style sheet called sheet1.css is linked to the document.
|
|
These style sheets, which are not part of the HTML document but are still used by it, are referred to as external style sheets. This is due to the fact that they're style sheets but are external to the HTML document. (Go figure.)
In order to successfully load an external style sheet, LINK must be placed inside the HEAD element but may not be placed inside any other
element, rather like TITLE or STYLE. This will cause the web browser to locate and load
the style sheet and use whatever styles it contains to render the HTML
document, in the manner shown in Figure
1-2.
And what is the format of an external style sheet? It's simply a list of rules, just like those we saw in the previous section and in the example above, but in this case, the rules are saved into their own file. Just remember that no HTML or any other markup language can be included in the style sheet--only style rules. Here's the markup of an external style sheet:
H1 {color: red;}H2 {color: maroon; background: white;}H3 {color: white; background: black; font: medium Helvetica;}
That's all there is to it--no STYLE
tags, no HTML tags at all, just plain-and-simple style declarations. These are
saved into a plain text file and are usually given an extension of .css, as in sheet1.css.
The filename extension is not required, but some browsers won't
recognize the file as containing a style sheet unless it actually ends with
.css, even if you do include
the correct TYPE of text/css in the LINK element.
So make sure you name your style sheets appropriately.
For the rest of the LINK tag, the
attributes and values are fairly straightforward. REL stands for "relation," and in this case, the relation
is "stylesheet." TYPE is always set to text/css. This value describes the type of data that is
to be loaded using the LINK tag. That way, the web
browser knows that the style sheet is a CSS style sheet, a fact that will
determine how the browser deals with the data it imports. After all, there may
be other style languages in the future, so it will be important to say which
language you're using.
Next we find the HREF attribute. The
value of this attribute is the URL of your style sheet. This URL can be either
absolute or relative, depending on what works for you. In our example, of
course, the URL is relative. It could as easily have been something like http://www.style.org/sheet1.css.
Finally, there is the TITLE
attribute. This attribute is not often used, but it could become important in
the future. Why? It becomes important when there is more than one LINK tag--and there can be more than one. In these cases,
however, only those LINK tags with a REL of stylesheet will be used
in the initial display of the document. Thus, if you wanted to link in two
style sheets with the names basic.css and splash.css, the markup would look like this:
<LINK REL="stylesheet" TYPE="text/css" HREF="basic.css"><LINK REL="stylesheet" TYPE="text/css" HREF="splash.css">
This will cause the browser to load both style sheets, combine the rules from each, and apply the result to the document (see Figure 1-3). We'll see exactly how the sheets are combined in the next chapter, but for now, let's just accept that they're combined. For example:
<LINK REL="stylesheet" TYPE="text/css" HREF="sheet-a.css"><LINK REL="stylesheet" TYPE="text/css" HREF="sheet-b.css"><P CLASS="a1">This paragraph will be gray only if styles from thestylesheet 'sheet-a.css' are applied.</P><P CLASS="b1">This paragraph will be gray only if styles from thestylesheet 'sheet-b.css' are applied.</P>
|
|
It's also possible to define alternate style sheets. These are
marked with a REL of alternate stylesheet and come
into play only if they're selected by the reader.
Unfortunately, as of this writing, browsers don't make it very
easy to select alternate style sheets, assuming that they can do so at all.
Should a browser be able to use alternate style sheets, it will use the values
of the TITLE attributes to generate a list of style
alternatives. So you could write the following:
<LINK REL="stylesheet" TYPE="text/css"HREF="sheet1.css" TITLE="Default"><LINK REL="alternate stylesheet" TYPE="text/css"HREF="bigtext.css" TITLE="Big Text"><LINK REL=" alternate stylesheet " TYPE="text/css"HREF="spoken.css" TITLE="Spoken Word">
Users could then pick the style they wanted to use, and the browser would switch from the first one (labeled "Default" in this case) to whichever the reader picked. Figure 1-4 shows one way in which this selection mechanism might be accomplished.
|
|
WARNING:
Alternate styles sheets are only supported by one browser as of this writing--Internet Explorer for Macintosh--and that only with a JavaScript widget, which does not ship with the browser. None of the three major browsers natively supports the selection of alternate style sheets (shown in Figure 1-4).
As of this writing, the one browser that does recognize
alternate style sheets (Internet Explorer for Macintosh) will not apply the
styles from any LINK element with a REL of alternate stylesheet unless that style sheet is selected by the
user.
The STYLE element, which is a
relatively new element in HTML, is the most common way to define a style
sheet, since it appears in the document itself. STYLE should always use the attribute TYPE; in the case of a CSS1 document, the correct value
is text/css, just as it was with the LINK tag. So, the STYLE
container should always start with <STYLE TYPE="text/css">. This is followed by one or more
styles and finished with a closing </STYLE>
tag.
The styles between the opening and closing STYLE tags are referred to as the document style sheet or the embedded
style sheet, since this style sheet is embedded within the document. It
contains styles that apply to the document, but it can also contain multiple
links to external style sheets using the @import
directive.
Now for the stuff that is found inside the STYLE tag. First, we have something very similar to LINK: the @import directive.
Just like LINK, @import
can be used to direct the web browser to load an external style sheet and use
its styles in the rendering of the HTML document. The only real difference is
in the actual syntax of the command and its placement. As you can see, @import is found inside the STYLE container. It must be placed there, before the
other CSS rules, or else it won't work at all.
<STYLE TYPE="text/css">@import url(styles.css); /* @import comes first */H1 {color: gray;}</STYLE>
Like LINK, there can be more than one
@import statement in a document. Unlike LINK, however, the style sheets of every @import directive will always be loaded and used. So
given the following, all three external style sheets will be loaded, and all
of their style rules will be used in the display of this document:
@import url(sheet2.css);@import url(blueworld.css);@import url(zany.css);
WARNING:
Only Internet Explorer 4.x/5.x and Opera 3.x support
@import; Navigator 4.x ignores this method of applying styles to a document. This can actually be used to one's advantage in "hiding" styles from these browsers. See Chapter 11, CSS in Action, for more details.
H1 {color: maroon;}BODY {background: yellow;}
After the @import statement in our
example, we find some ordinary styles. What they mean doesn't actually matter
for this discussion, although you can probably guess that they set H1 elements to be maroon and BODY elements to have a yellow background.
Styles such as these comprise the bulk of any embedded style
sheet--style rules both simple and complex, short and long. It will be only
rarely that you have a document where the STYLE
element does not contain any rules.
For those of you concerned about making your documents
accessible to older browsers, there is an important warning to be made. You're
probably aware that browsers ignore tags they don't recognize; for example, if
a web page contains a BLOOPER tag, browsers will
completely ignore the tag because it isn't a tag they recognize.
The same will be true with style sheets. If a browser does not
recognize <STYLE> and </STYLE>, it will ignore them altogether. However,
the declarations within those tags will not be
ignored, because they will appear to be ordinary text so far as the browser is
concerned. So your style declarations will appear at the top of your page! (Of
course, the browser should ignore the text because it isn't part of the BODY element, but this is never the case.) This problem
is illustrated in Figure
1-5.
|
|
In order to combat this problem, it is recommended that you
enclose your declarations in a comment tag. In the example given here, the
beginning of the comment tag appears right after the opening STYLE tag, and the end of the comment appears right
before the closing STYLE tag:
<STYLE type="text/css"><!--@import url(sheet2.css);H1 {color: maroon;}BODY {background: yellow;}--></STYLE>
This should cause older browsers to completely ignore not only
the STYLE tags but the declarations as well,
because HTML comments are not displayed. Meanwhile, those browsers that
understand CSS will still be able to read the style sheet.
WARNING:
There is one drawback to this strategy. A few versions of older browsers, such as very early versions of Netscape Navigator and NCSA Mosaic, had some trouble with comments. The problems ranged from mangled display to browser crashes. This happened with only a very few browser versions, and it's safe to say that very few of these browsers are still being operated. Be aware that there are some people out there using these particular browsers, and they may well have major problems viewing your page if you use these comment tags.
/* These are my styles! Yay! */CSS also allows for comments, but it uses a completely different
syntax to accomplish this. CSS comments are very similar to C/C++ comments, in
that they are surrounded by /* and */:
/* This is a CSS1 comment */Comments can span multiple lines, just as in C++:
/* This is a CSS1 comment, and itcan be several lines long withoutany problem whatsoever. */
It's important to remember that CSS comments cannot be nested. So, for example, this would not be correct:
/* This is a comment, in which we findanother comment, which is WRONG/* Another comment */and back to the first comment */
However, it's hardly ever desirable to nest comments, so this limitation is no big deal.
If you wish to place comments on the same line as markup, then you need to be careful about how you place them. For example, this is the correct way to do it:
H1 {color: gray;} /* This CSS comment is several lines */H2 {color: silver;} /* long, but since it is alongside */P {color: white;} /* actual styles, each line needs to */PRE {color: gray;} /* be wrapped in comment markers. */
Given this example, if each line isn't marked off, then most of the style sheet will become part of the comment, and so will not work:
H1 {color: gray;} /* This CSS comment is several linesH2 {color: silver;} long, but since it is not wrappedP {color: white;} in comment markers, the last threePRE {color: gray;} styles are part of the comment. */
In this example, only the first rule (H1 {color: gray;}) will be
applied to the document. The rest of the rules, as part of the comment, are
ignored by the browser's rendering engine.
Moving on with our example, we see some more CSS information actually found inside an HTML tag!
<P STYLE="color: gray;">The most wonderful of all breakfast foods isthe waffle-- a ridged and cratered slab of home-cooked, fluffy goodness...</P>
For cases where you want to simply assign a few styles to one
individual element, without the need for embedded or external style sheets,
you'll employ the HTML attribute STYLE to set an
inline style. The STYLE
attribute is new to HTML, and it can be associated with any HTML tag
whatsoever, except for those tags which are found outside of BODY (HEAD or TITLE, for instance).
The syntax of a STYLE attribute is
fairly ordinary. In fact, it looks very much like the declarations found in
the STYLE container, except here the curly brackets
are replaced by double quotation marks. So <P
STYLE="color: maroon;
background: yellow;">
will set the text color to be maroon and the background to be yellow for that paragraph only. No other part of the document
will be affected by this declaration.
In order to facilitate a return to structural HTML, something was needed to permit authors to specify how a document should be displayed. CSS fills that need very nicely, and far better than the various presentational HTML elements ever did (or probably could have done). For the first time in years, there is hope that web pages can become more structural, not less, and at the same time the promise that they can have a more sophisticated look than ever before.
In order to ensure that this transition goes as smoothly as possible, HTML introduces a number of ways to link HTML and CSS together while still keeping them distinct. This allows authors to simplify document appearance management and maximize their effectiveness, thereby making their jobs a little easier. The further benefits of improving accessibility and positioning documents for a switch to an XML world make CSS a compelling technology.
As for user agent support, the LINK element has been universally supported, as have both the STYLE element and attribute. @import didn't fare so well, though, being ignored outright by Navigator 4. This is not such a major tragedy, annoying though it might be, since the LINK element will still let you bring external style sheets into play.
In order to fully understand how CSS can do all of this, authors need a firm grasp of how CSS handles document structure, how one writes rules that behave as expected, and most of all, what the "Cascading" part of the name really means.
This tutorial shamefully extracted (and cleaned up) from this site.
| CHAPTER 12: Advanced Concepts |
Although English is a widely-used language for communication, it is by no means the only language in the world. Support for the other languages is a concern which the standards committees are still addressing. In the meantime, some non-English languages have some character support in the form of character entities, and that's what this chapter will cover.
Some fonts may not display character entities correctly. Rather than go with graphics, which would ensure display but take longer to load, I have chosen to stick with the defined character entities. If the text describes something different than what you see, then try switching display fonts and see if that helps.
Although a great deal of information can be conveyed using standard keyboard characters, such as letters and numbers, this doesn't work as well in countries where the inhabitants speak a language other than English. (Note to American readers: such countries do exist! Honest!) Languages such as French, German and Icelandic make use of characters that aren't found on the typical American-made computer keyboard.
Furthermore, there are words in English which require such characters. If you've ever put up a page listing your employment history, then you've likely put up your resume-- which, if you were to look that word up in a dictionary, would mean that you'd put up a continuation of some sort. What you really meant to put on-line was your "résumé."
Many of these "foreign-language" characters are found in the ISO Latin Alphabet No. 1, otherwise known as Latin-1, upon which character systems like ASCII are based. (Incidentally, ISO refers to the International Organization for Standardization.) Letters with acute and grave accents, umlauts, eths, and other such characters can be found in this table, as well as some currency and scientific symbols. Latin-1 is the base character set for HTML.
Only-- how to put these characters in a Web page? If you have a Macintosh or Windows machine, there may be keyboard shortcuts to produce some of these symbols. For example, on a Macintosh, hitting Option-e and then typing e will produce "é". However, if you simply type é in a Mac word processor, save the file as text, and then load it into a Web browser, you are likely to get something different, if you get anything at all.
Why does this happen? The character code used to represent "é" on a Macintosh doesn't directly translate to Latin-1. Your Web browser sees the character and tries to do something with it. The fact that it displays another character is not your browser's fault. A Web browser isn't supposed to recognize the Macintosh character set, nor should it be expected to do so.
Browsers are supposed to recognize the Latin-1 character set, however. This character set is a list of 255 characters, many of which appear on standard keyboards, but many of which do not. It is very similar to the basic ASCII table that computer geeks are familiar with, although it differs significantly from proprietary character sets such as the IBM and Macintosh sets.
Note that Greek, Cyrillic, Arabic, Oriental, and most other non-Romanic languages are not supported in Latin-1. That's part of what the internationalization standards committees are working on.
Okay, so how do you get these characters to appear if you can't just type them in? How did I get "é" to appear on this page, for that matter? To do this, you use what are referred to as character entities. These are special codes which let the Web browser know that it needs to use one of the Latin-1 characters.
Character entities do not look like ordinary HTML tags. Actually, they aren't tags at all, which is why we refer to them as entities. The general form of a character entity is:
&code; (where code is the character's code)
Every entity begins with an ampersand (&) and ends with a semicolon (;). Between those symbols is a code which is unique to the character in question. There are two kinds of entities: text entities and numeric entities. Each text entity uses a unique code to identify the character, and each numeric entity uses a number to represent a given character.
Text entities are fairly easy to deal with, because they are designed to be easily remembered. For example, the symbol I've been using is a lower case e with an acute accent. The code for this character is é. With a minimum of study, you can see that the code is the words "e" and "acute" mashed together. In order to get an upper-case e with an acute accent (É), you would use the entity É.
Notice the difference is that in the second entity, the "e" is capitalized. This brings up the important point that the capitalization of character entities is important. If you type an entity incorrectly, your browser will most likely display the whole thing verbatim. For example:
HTML Text Result ------------------------- é é É É &EACUTE; &EACUTE; &eACUTE; &eACUTE;
The last two didn't work because they are not valid entities-- the capitalization is all wrong.
The four most important text entities, the ones that every browser known to humanity should deal with, are as follows:
& & (ampersand) < < (less-than symbol) > > (greater-than symbol) " " (double-quotation mark)
& (&): Since the ampersand (&) is used as a begin-symbol for character entities, similar to the use of < to begin HTML tags, simply typing the ampersand character from the keyboard can be dangerous and confusing to a Web browser. If you want to be sure that an ampersand shows up in the browser display window as an ampersand, then the entity & should be used. This is useful if you want to show a text entity, as I have been doing throughout this chapter. In order to display é, I need to type &eacute;. To produce that last example, I needed to type &amp;eacute; -- and so on.
< and > (< and >): Since these symbols are used to delimit HTML tags, there is a high probability that using them in a page will confuse a Web browser, and the odds of this happening are much higher than with an ampersand. Use of the less-than and greater-than entities ensures proper display.
" ("):The double-quotation mark, since it is often used in HTML tags to enclose labels or URLs, should be represented by its text entity when it is found in normal text. This rule is probably one of the most-often ignored, because it's a lot easier to just type in the symbol on the keyboard, and nearly every browser will not have a problem displaying it as typed. Still, it's something to keep in mind as a possible source of strange display errors.
Although there are 255 characters in the Latin-1 table, there are not nearly so many text entities-- well, not yet, anyway. There are a great many symbols, such as the pound sterling, which do not have associated text entities. Therefore, using numeric references is not only useful, but "more correct" from the standpoint of making the entity more universally recognizable to browsers.
These symbols are represented using numeric entities instead. Numeric entities have the form:
&#xxx; (where xxx is a number 0 - 255)
Note the use of the symbol # (referred to as a pound-sign, hash mark, or number-sign). It must precede the actual number, or else the entity will not be recognized. The number used for a specific symbol corresponds to its position in the Latin-1 table. The 201st character would use the code É and produce the character É. Look familiar? That's right, it's a capital E with an acute accent. In other words, É and É are equivalent. Using either one will yield an É.
In this, the final chapter, we will look at the markup used to imbed Java applets into a Web page. These objects can be used to do almost anything, from dynamic forms to animations, from stock tickers to arcade games. This is all thanks to the power of Java, which is an object-oriented programming language similar to C++.
Because of the complex nature of Java, I will not be attempting to teach it in this tutorial. A mere introduction to Java would require a tutorial of its own, and so I will confine myself to covering the HTML tag APPLET and leave the Java teaching to others.
If you don't know Java and don't plan to learn, then you can safely skip this chapter. It's all about the markup used for loading Java applets, and doesn't contain anything which would be useful in any other circumstance.
First of all, applets are imbedded into Web pages using the <APPLET> ... </APPLET> container (we'll get to why it's a container near the end of the chapter). There are a number of attributes to APPLET, some of which will sound rather familiar. Some of them even act the same as they do with other tags. However, I will first cover those tags which are unique to APPLET or have different effects than they would for other tags.
In order for a Java applet to function, it will need to be loaded by the browser and then run. This only makes sense, of course. The browser is told where to look for the compiled Java code using the code attribute, which is a required attribute (so don't forget to use it!).
Let's assume that your Web page has an APPLET tag and that, furthermore, there is a subdirectory called java which contains the applet zigzag.class. In that case, the basic markup to load this applet would be:
   <APPLET code="java/zigzag.class">
   </APPLET>
This points out a basic rule of the code attribute: the URL of the compiled Java code must be relative. The value of code is never an absolute URL, always relative.
Relative to what? Well, that depends. There is another attribute which can be used to define the directory in which the Java applet can be found. This attribute is codebase, and it's probably best to give it a value which is an absolute URL. This value will tell the browser where it should look for any Java applets it needs to load.
So, changing the above example a bit, assume that the applet zigzag.class is in the directory http://www.site.org/java/. The applet's markup would then read:
   <APPLET codebase="http://www.site.org/java" code="zigzag.class">
   </APPLET>
codebase is an optional attribute; if it is not defined, the browser will use the document's URL as the implicit value of codebase.
Or, a brief summary of those attributes which you've seen in other tags, and which do pretty much the same things.
First, there is the name attribute. This is used to give a name to the applet, in case the page has multiple applets which need to communicate with each other. Obviously, if you don't give an applet a name, other applets won't be able to find it.
   <APPLET name="ZZ1" codebase="http://www.site.org/java" code="zigzag.class">
   </APPLET>
The attributes width, height, hspace, vspace, and align all function exactly the same for APPLET as they do for the IMG tag, so there really isn't that much to say about them.
If the applet calls up any windows or dialogs, they are not necessarily constrained to the area defined by the height and width attributes; in fact, they almost certainly won't be. Therefore, height and width are used to define the size of the initial applet.
Here's another attribute which you should remember from the IMG tag: alt. With images, alt is used to specify a text alternative for those browsers which can't display images, or those which have image loading turned off. With the APPLET tag, alt is used to specify text which will be displayed in a browser which understands the APPLET tag, but for some reason can't run the Java applet in question.
   <APPLET name="ZZ1"
       codebase="http://www.site.org/java" code="zigzag.class"
       alt="Sorry, this Java applet could not run.">
   </APPLET>
This might be because something goes wrong, or perhaps because the user has disabled Java on his machine. Either way, the value of alt should be displayed by the browser.
Now, this brings up an interesting question: what about browsers that don't even recognize the APPLET tag? Not only will they not run the applet, but they'll also ignore the alt text in the tag! What to do?
Here, at last, we come to the reason why APPLET is a container. Anything you place within the APPLET container (besides the PARAM tag, which we'll get to in a moment) will be displayed by browsers which don't understand the applet tag. Bear in mind, though, that the content is restricted to text-level entities... which is to say, text with style tags, and image tags, are both okay. No headings, paragraphs, tables, lists, preformatted text, forms, or horizontal rules are allowed.
   <APPLET name="ZZ1"
       codebase="http://www.site.org/java" code="zigzag.class"
       alt="Sorry, this Java applet could not run.">
   You don't have Java available, so this applet won't run.
   </APPLET>
In the above example, browsers which understand APPLET but can't run Java will display "Sorry, this Java applet could not run." whereas browsers that don't understand APPLET will display "You don't have Java available, so this applet won't run." You can put pretty much any text you want inside the container (within the limitations I mentioned in the last paragraph). This text could be a link to a Java FAQ, or a warning message, or an image of the applet running, or a cruel and heartless taunt. It's your choice.
Sometimes, of course, you'll want to pass information to the applet in question from your page. This lets you develop generic applets which do various things based on the information passed to them from a page. The method for doing so is...
PARAM stands for "parameter," which is what you're passing to an applet. PARAM has two attributes: name and value. These are very similar to the corresponding attributes of the INPUT tag, in that each PARAM must have a unique name and the value is passed to the applet under the corresponding name.
   <APPLET name="ZZ1"
       codebase="http://www.site.org/java" code="zigzag.class"
       alt="Sorry, this Java applet could not run.">
   <PARAM name="zig" value="5">
   <PARAM name="zag" value="10">
   You don't have Java available, so this applet won't run.
   </APPLET>
In this case, the applet zigzag.class will receive data looking something like zig=5 zag=10. That isn't precisely what the data looks like, of course, but it's conceptually accurate. The applet must be prepared to receive these parameters, of course. Otherwise, they'll have no effect whatsoever.
Once again, if none of this made sense, my advice is not to worry about it until you learn Java. Once you've learned the language, this chapter will seem almost childish in its simplicity anyway.